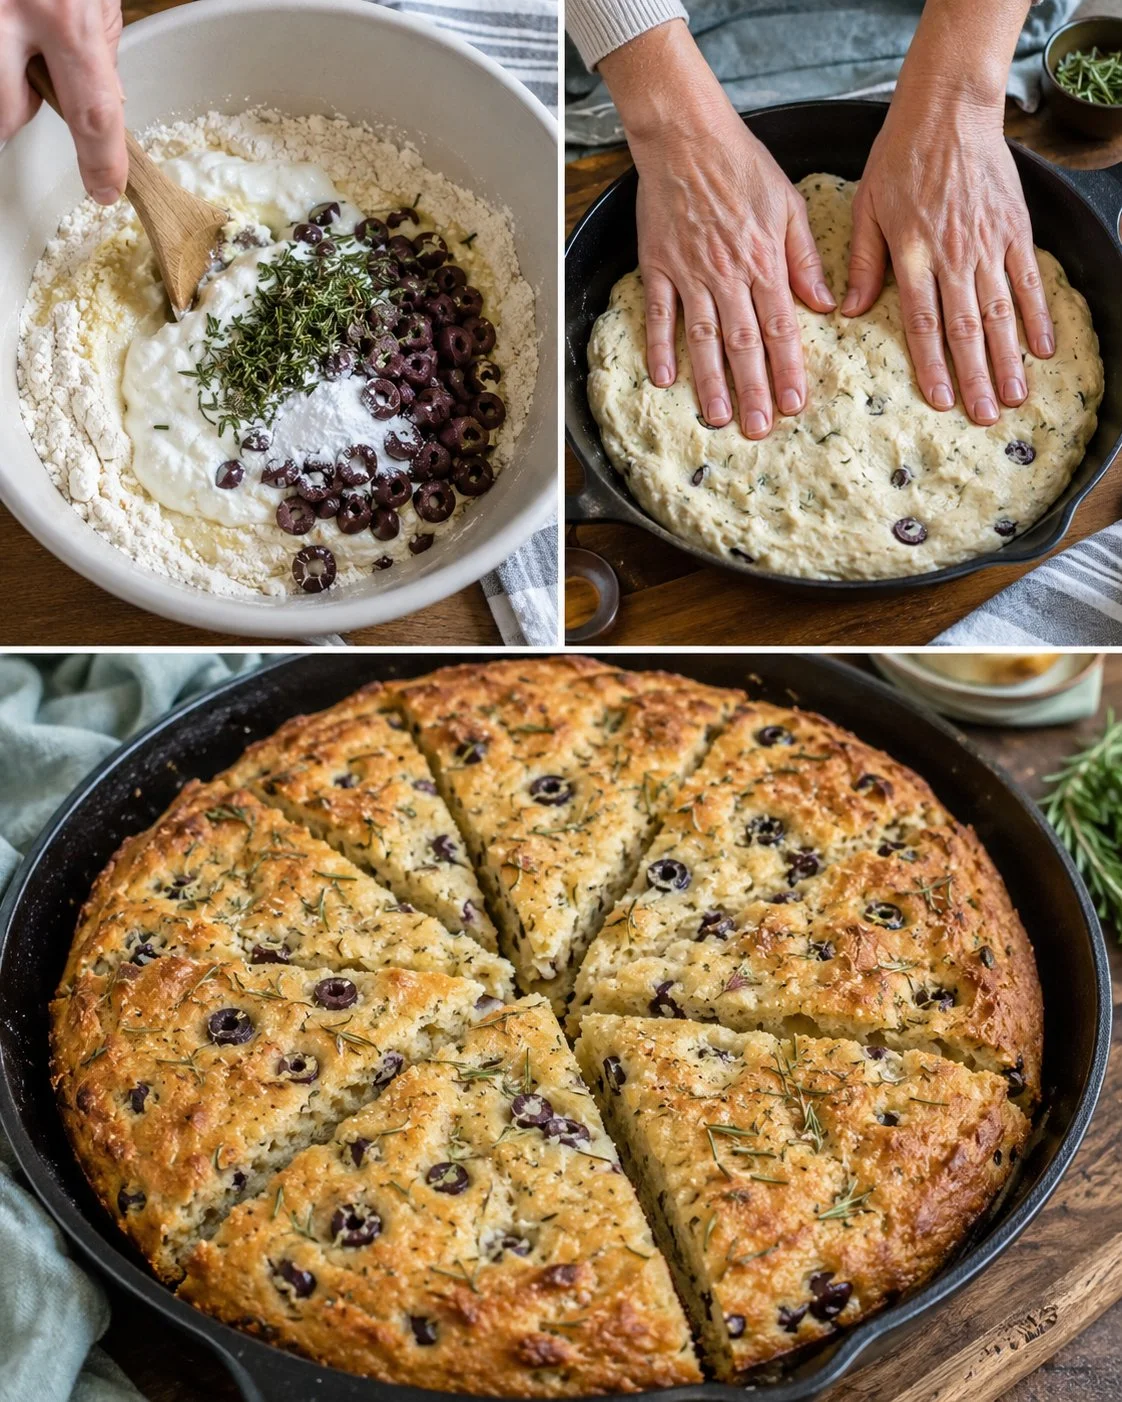
This no-yeast skillet bread is my favorite “I need fresh bread now” solution: it’s mixed in one bowl, shaped by hand, and cooked right on the stovetop with a lid—no oven, no rise time, no special equipment. The yogurt keeps the crumb tender while the olive oil, rosemary, and olives make it feel a little special. Nutrition-wise, it’s still a white-flour quick bread (so it’s more of a comfort-carb than a high-fiber option), and the olives add sodium—so if you’re watching salt or blood sugar, it’s best enjoyed in sensible wedges alongside a protein or salad. If you like baking shortcuts, you might also enjoy this no-yeast bread idea for when you want something even more pantry-friendly.
This recipe is best for home cooks who want a warm, savory bread for dipping, soups, or a simple snack board. The dough should feel soft and slightly tacky, not dry—once it hits the hot skillet, that moisture helps it cook through without turning tough. The key is low heat and a covered pan so the center steams and sets before the outside over-browns.
Why This Recipe Is Helpful
- No yeast and no waiting: you can start mixing and be eating in about 25–30 minutes.
- Stovetop method is great when you don’t want to heat up the oven (or don’t have one).
- Yogurt + baking powder makes a tender, lightly tangy quick-bread crumb.
- Rosemary and olives add big flavor with minimal effort—no need for extra spreads to make it taste good.
- Easy to scale up for guests (double the dough and cook two rounds).
- Works well as a “make dinner feel complete” side with soup, eggs, salads, or roasted vegetables.
Who This Recipe Is Best For
If you like savory breads with bold, Mediterranean-style flavors, this one’s for you. It’s also great for beginners because the dough is forgiving—no proofing, no kneading skills required beyond a quick 20–30 second tidy-up. Anyone who enjoys a warm, wedge-style bread for dipping (olive oil, soups, stews) will be happy here.
Who Should Be Careful
This bread is made with all-purpose flour and cooks up fairly carb-forward, so it may not be ideal for people managing blood sugar who do best with higher-fiber grains or smaller portions. It’s also not a low-sodium bread—olives and added salt can add up—so consider using less salt or choosing lower-sodium olives if that’s important for you. And of course, it contains dairy (yogurt) and gluten.
Ingredients
- 2 cups (250 g) all-purpose flour
- 1 tablespoon (12 g) baking powder
- 1/2 teaspoon (3 g) fine salt
- 3/4 cup (180 g) plain yogurt (regular or Greek)
- 2 tablespoons (30 ml) olive oil, plus a little more for the skillet
- 2 tablespoons (6 g) chopped fresh rosemary
- 1/3 cup (50 g) chopped olives (pitted)
- 1/3 to 1/2 cup (80–120 ml) water, as needed
Ingredient Notes
- Yogurt: Plain yogurt gives tenderness and a subtle tang. Greek yogurt works too, but you’ll likely need a bit more water since it’s thicker.
- Baking powder: This is your “lift” since there’s no yeast. Make sure it’s fresh; old baking powder can make the bread dense.
- Olives: Any pitted olive works—Kalamata for bold flavor, green olives for a sharper bite. If your olives are very briny, blot them dry so the dough doesn’t turn wet.
- Rosemary: Fresh is best here. If using dried, use about 2 teaspoons (it’s stronger and more concentrated).
- Water amount: Humidity, flour brand, and yogurt thickness change the dough. Add water slowly—too wet is easier to fix (add a pinch of flour) than too dry.
Kitchen Tools Needed
- Large mixing bowl
- Whisk or fork
- Spoon or spatula
- 10-inch (25 cm) skillet with a lid (cast iron or nonstick both work)
- Cutting board and knife
Step-by-Step Instructions
- Mix the dry ingredients. In a large bowl, whisk together the flour, baking powder, and salt until evenly combined.
- Add the flavor and moisture. Stir in the yogurt, olive oil, chopped rosemary, and chopped olives.
- Add water gradually. While stirring, drizzle in water a little at a time until a soft dough forms. You’re aiming for a dough that holds together and feels pliable—slightly tacky is fine.
- Knead briefly. Turn the dough onto a lightly floured surface and knead for about 20–30 seconds, just until it looks smoother and less shaggy. Don’t overwork it or it can turn tough.
- Shape for the skillet. Lightly oil the skillet. Press the dough into the skillet into a thick round (about 1 to 1 1/4 inches / 2.5–3 cm thick). Smooth the top with your hand.
- Cook low and covered. Cover the skillet and cook over low heat for 10–12 minutes. You want gentle heat—if you hear aggressive sizzling, turn it down.
- Flip carefully. Slide a spatula underneath and flip the bread. Cover again and cook 8–10 minutes more, until both sides are browned and the center feels set. (If you’re unsure, you can insert a knife near the center; it should come out without wet dough.)
- Rest, then slice. Let the bread rest for 5 minutes before cutting into wedges. This helps the inside finish setting and keeps it from turning gummy.
Pro Tips
- Keep the heat low: High heat browns the outside before the middle cooks through.
- Use a lid: The trapped steam is what cooks the center properly on the stovetop.
- Don’t chase a dry dough: A slightly soft dough bakes up more tender; dry dough turns dense.
- Blot olives: Excess brine can make pockets of wet dough around the olive pieces.
- For a prettier top: Before cooking, score a shallow X on top so it expands more evenly.
Healthier or Lighter Swaps
- Swap in some whole wheat flour: Try replacing 1/2 cup (60 g) of the all-purpose flour with whole wheat flour for a bit more fiber and a heartier bite (you may need a splash more water).
- Use lower-fat yogurt: Plain low-fat yogurt works fine; the bread will be slightly less rich but still tender.
- Reduce sodium: Use low-sodium olives and cut the salt to 1/4 teaspoon (1.5 g) if needed.
- Serve smaller wedges: This is an easy, practical way to keep it balanced when pairing with soup or a protein-heavy meal.
Common Mistakes
- Cooking over medium/high heat: You’ll get a burnt bottom and an undercooked center.
- Adding all the water at once: The dough can go from perfect to sticky fast—add gradually.
- Over-kneading: This isn’t yeast dough; too much kneading can make it chewy and tight.
- Skipping the rest: Cutting immediately can make the crumb feel gummy.
Variations
- Lemon-zest rosemary: Add 1 teaspoon lemon zest for a brighter flavor.
- Feta olive bread: Add 1/3 cup (50 g) crumbled feta and reduce salt slightly.
- Garlic herb: Mix in 1 small grated garlic clove or 1/2 teaspoon garlic powder.
- Chili olive: Add a pinch of chili flakes for gentle heat.
Serving Suggestions
Serve warm wedges with olive oil and a little black pepper, alongside tomato soup, lentil soup, or a big chopped salad. For a more balanced plate, pair it with eggs, grilled chicken, tuna salad, or a bean dip—this helps round out the meal since the bread itself is mostly refined flour.
Storage Instructions
Let leftovers cool completely, then store in an airtight container or zip-top bag at room temperature for up to 2 days. For longer storage, wrap well and freeze for up to 2 months.
Reheating Tips
Reheat wedges in a dry skillet over low heat for 1–2 minutes per side to bring back the crust. You can also warm in a 350°F (175°C) oven for about 6–8 minutes. Microwaving works in a pinch, but it softens the crust.
Nutrition Estimate
Per serving (1/6 of the bread): about 230 calories, 7 g protein, 36 g carbs, 7 g fat.
Values are estimates and will vary depending on yogurt type, olive amount, and how large you cut the wedges.
Recipe Summary
- Prep Time: 10 minutes
- Cook Time: 20–22 minutes
- Total Time: 30–35 minutes
- Servings: 6
- Cuisine: Mediterranean-inspired
- Course: Side / Bread
- Calories: ~230 per serving (estimate)
Frequently Asked Questions
Can I use Greek yogurt instead of regular yogurt?
Yes. Greek yogurt works well, but because it’s thicker you’ll likely need closer to