Ever have a couple of ripe pears on the counter and no patience for hauling out a mixer? This cozy pear-and-walnut oat cake is my answer. It’s naturally gluten-free (as long as you use certified gluten-free oats), lightly sweetened with maple syrup, and sturdy enough for breakfast but still feels like a real treat with coffee. The grated pear melts into the batter and keeps everything moist, while the sliced pear on top turns soft and a little jammy around the edges in the oven.
A small thing that makes a big difference: blending the oats until they’re very fine. If you leave them too coarse, the cake can taste a bit “porridge-y” instead of tender. I also like to let it cool for at least 15 minutes—too early and it can crumble, but once it settles, the slices hold beautifully.
Why You’ll Love This Recipe
- No flour and no mixer—just a blender/food processor and a bowl.
- Moist, tender crumb thanks to grated pear and yogurt.
- Naturally sweetened with maple syrup (not overly sugary).
- Great use for ripe pears that are getting soft.
- The pear-and-walnut topping makes it look special with almost no effort.
- Practical baking insight: finely blended oats = cake texture, not oatmeal texture.
Ingredients
- 2 ripe pears, divided: 1 pear grated, 1 pear thinly sliced
- 2 cups (180 g) rolled oats
- 2 large eggs
- 3/4 cup (180 g) plain yogurt (regular or Greek)
- 1/4 cup (60 ml) maple syrup
- 1 1/2 teaspoons baking powder
- 1 teaspoon ground cinnamon
- 1/2 cup (55 g) chopped walnuts, divided
- Optional (recommended): pinch of fine salt, about 1/8 teaspoon (helps the flavors pop)
Ingredient Notes
- Pears: Ripe pears make the cake naturally sweet and moist. If your pears are very juicy, it’s okay—just expect the batter to look a little looser; it bakes up fine.
- Rolled oats: Use old-fashioned rolled oats. Quick oats can work in a pinch, but the texture is slightly more uniform and less hearty. For gluten-free, use certified gluten-free oats.
- Yogurt: Plain yogurt adds tenderness and a gentle tang. Greek yogurt works too; if it’s very thick, the batter may be slightly stiffer (still fine).
- Maple syrup: Real maple syrup gives a warm sweetness. Honey will work, but it tastes different and is slightly sweeter.
- Walnuts: Toasting them is optional, but if you have 5 minutes, it adds a lot of flavor.
Kitchen Tools Needed
- 8-inch (20 cm) round cake pan
- Parchment paper (or baking spray)
- Blender or food processor (to make oat flour)
- Mixing bowl
- Whisk or sturdy spoon
- Box grater (for the pear)
- Knife and cutting board
- Measuring cups/spoons (or a kitchen scale)
Step-by-Step Instructions
-
Preheat and prep the pan.
Heat the oven to 350°F (180°C). Line an 8-inch (20 cm) round pan with parchment paper (bottom and a strip around the sides if you can), or grease it well. -
Make oat flour.
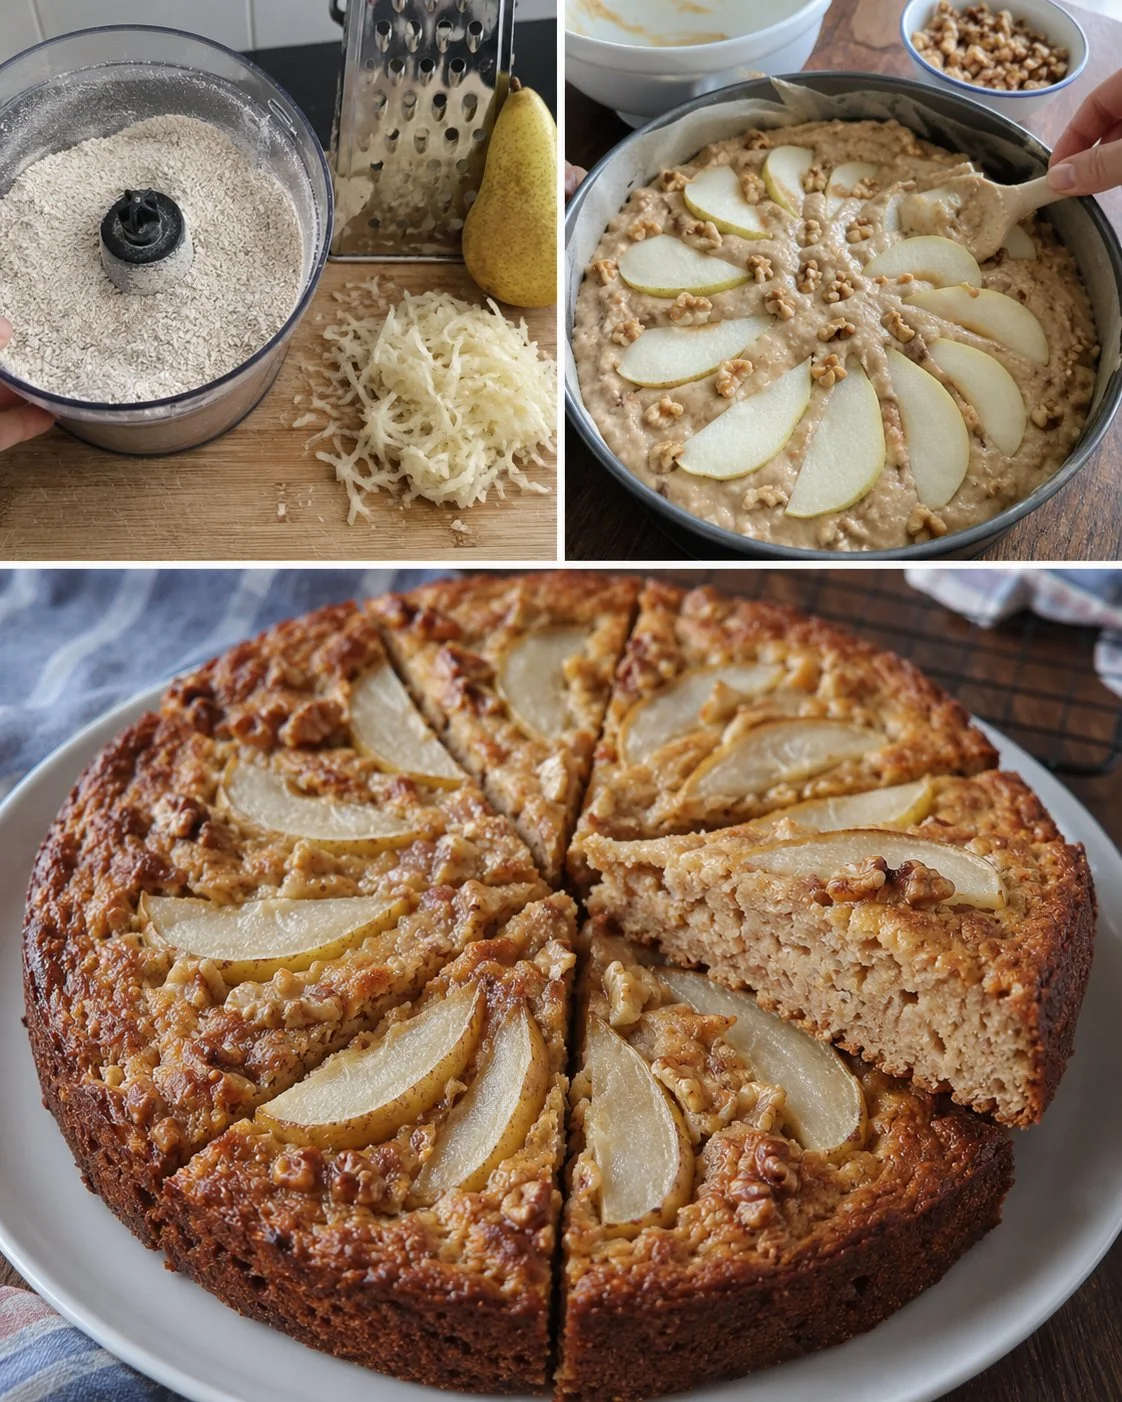
Add the rolled oats to a blender or food processor and blend until you get a fine, flour-like texture. You’re looking for something closer to flour than gritty meal—this helps the cake slice cleanly. -
Prep the pears.
Peel if you like (not required). Grate one pear on the large holes of a box grater. Thinly slice the other pear (about 1/8-inch / 3 mm slices is great). If your pear is very juicy, don’t worry—just keep all the grated pear and juices. -
Mix the batter.
In a mixing bowl, combine the oat flour, grated pear, eggs, yogurt, maple syrup, baking powder, cinnamon, and half the walnuts. Add the optional pinch of salt. Stir until evenly mixed; the batter will be thick but spoonable. -
Fill the pan and top.
Scrape the batter into the prepared pan and smooth the top. Arrange the pear slices over the surface (overlapping is pretty and helps the top stay moist). Sprinkle with the remaining walnuts. -
Bake.
Bake for 35–40 minutes, until the cake is set in the center. A toothpick should come out mostly clean (a few moist crumbs are fine), and the edges will look lightly golden. If the top browns faster than you like, loosely cover with foil for the last 10 minutes. -
Cool before slicing.
Let the cake cool in the pan for 15 minutes, then lift out (if using parchment) and cool a bit longer before slicing. It slices best once it’s warm—not hot.
Pro Tips
- Blend the oats thoroughly. That’s the difference between “cake” and “baked oatmeal.”
- Slice pears thinly so they soften fully and don’t weigh down the top.
- Don’t overbake. If it goes too long, the edges dry out; pull it when the center is just set.
- Toast the walnuts (5–7 minutes at 350°F/180°C) for a deeper, nuttier flavor.
- Cool a little longer for cleaner slices. Warm is nice, but hot cake tends to crumble.
Common Mistakes
- Using coarse oat flour: Leads to a gummy or gritty texture.
- Cutting too soon: The cake needs time to set; slicing immediately can make it fall apart.
- Underbaking the center: If the middle still looks wet and wobbly, give it a few more minutes.
- Packing the pears too thick on top: Thick slices can stay firm and make the top heavy.
- Forgetting to line/grease the pan well: Oat-based cakes love to stick.
Variations
- Add vanilla: 1 teaspoon vanilla extract pairs beautifully with pear and cinnamon.
- Swap the nuts: Use chopped pecans or almonds instead of walnuts.
- Add spices: A pinch of nutmeg or ground ginger makes it more “fall.”
- Make it dairy-free: Use a thick plain dairy-free yogurt (coconut or almond-based). (The flavor will shift slightly, but it works.)
Serving Suggestions
- Serve warm with extra yogurt or a spoonful of ricotta.
- For dessert, a drizzle of maple syrup or a little whipped cream is lovely.
- It’s also great alongside coffee or tea as a snack cake.
- If you want a more breakfast-y vibe, add fresh berries on the side.
Storage Instructions
- Store covered at room temperature for 1 day, or refrigerate in an airtight container for up to 4–5 days.
- For longer storage, freeze slices (wrap well) for up to 2 months.
Reheating Tips
- Warm slices in the microwave for 10–20 seconds until just heated through.
- Or reheat in a 300°F (150°C) oven for 5–8 minutes to freshen the edges.
Nutrition Estimate
Approximate per serving (1/8 of cake):
210 calories, 7 g protein, 29 g carbs, 9 g fat
Recipe Summary
- Prep Time: 15 minutes
- Cook Time: 35–40 minutes
- Total Time: 55 minutes
- Servings: 8
- Cuisine: American
- Course: Breakfast / Snack / Dessert
- Calories: ~210 per serving
Frequently Asked Questions
Can I make this without a blender or food processor?
You can use store-bought oat flour instead: use about 2 cups (180 g) oat flour by weight/volume equivalent. (If measuring by cups, scoop lightly—oat flour packs differently.)
What kind of yogurt works best?
Plain regular yogurt or Greek yogurt both work. Greek yogurt gives a slightly richer, denser slice. Avoid strongly flavored sweetened yogurts unless you want that flavor in the cake.
How do I know when it’s done?
Look for a set center (no wet wobble) and lightly browned edges. A toothpick in the middle should come out with a few moist crumbs, not wet batter.
Can I use apples instead of pears?
Yes—grate one apple and thinly slice another. Apples are a little less juicy than pears, so the cake may be slightly less moist but still very good.
Is this cake gluten-free?
It’s gluten-free if you use certified gluten-free oats (regular oats are often cross-contaminated).
Conclusion
If you like simple bakes that feel wholesome but still taste like something you’d happily serve to guests, this pear walnut oat cake is a keeper. It comes together quickly, uses everyday ingredients, and the pear-on-top finish makes it look far fussier than it is.