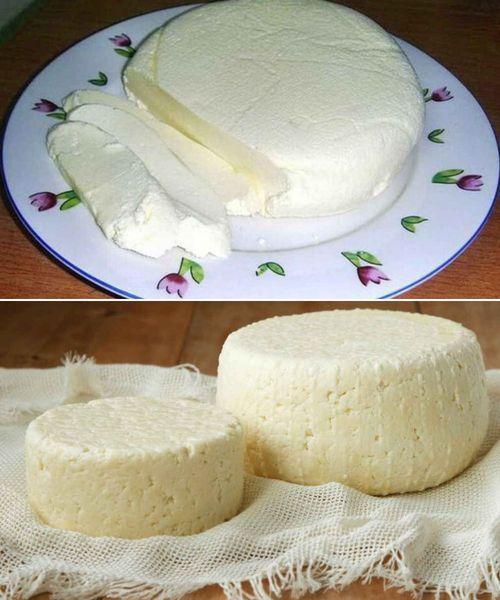
The Delightful Story Behind Yogurt Cheese
Imagine turning ordinary milk into a creamy, tangy delicacy right in your own kitchen. Homemade yogurt cheese, also known as labneh, is a culinary adventure that bridges the gap between yogurt and cheese, creating a versatile ingredient that can elevate everything from breakfast spreads to gourmet appetizers.
This ancient technique of cheese-making is surprisingly simple, requiring just a few ingredients and a bit of patience. What emerges is a rich, creamy cheese with a distinctive tang that can be used in countless ways – from a spread on fresh bread to a base for dips and sauces.
Ingredients: Your Comprehensive Cheese-Making Inventory
Prepare to gather these ingredients, with measurements in both US and European metrics:
- Whole Milk: 1 liter (about 33.8 fl oz / 4.2 cups / 1000 ml)
- Natural Yogurt (unsweetened): 1 cup (150 grams / about 5.3 oz)
- Lemons: 12 (for fresh juice, approximately 360-480 ml)
- Salt: To taste (about 1-2 teaspoons)
Step-by-Step Cheese-Making Instructions
Preparing the Base
- Milk Preparation Pour the whole milk into a large, heavy-bottomed saucepan. Bring the milk to a gentle boil over medium heat, stirring occasionally to prevent scorching. This process helps to sterilize the milk and begin the transformation process.
- Cooking the Milk Allow the milk to cook for exactly 15 minutes, maintaining a steady, gentle boil. This step helps to develop the right consistency and flavor for your yogurt cheese. Keep a close eye on the pot to prevent overflow or burning.
Curdling and Separating
- Adding Curdling Agents Remove the milk from heat. Squeeze fresh lemon juice – you’ll need juice from about 12 lemons. Add the natural yogurt to the warm milk. Stir the mixture slowly for just a few seconds, then turn off the heat.
- Resting Period Let the mixture rest undisturbed for at least 3 hours. This is a crucial step where the curds will begin to separate from the whey. The longer you let it rest, the firmer your cheese will become.
Straining and Finishing
- Straining Process Line a fine-mesh sieve with cheesecloth and place it over a large bowl or mold. Carefully pour the milk mixture into the lined sieve. The cheesecloth will catch the solids while allowing the whey to drain through.
- Refrigeration and Final Preparation Return the sieve with the cheese to the refrigerator for 30 minutes to help it firm up. After this initial chilling, add salt to taste and mix gently. Return to the refrigerator for an additional 8 hours to allow the flavors to develop and the cheese to continue draining.
Nutritional Breakdown and Cheese-Making Details
Yield: Approximately 250-300 grams of yogurt cheese Preparation Time: 20 minutes Resting Time: 11-12 hours Total Time: 12-13 hours Servings: 4-6
Nutritional Estimate (per 1/4 cup serving):
- Calories: 50-70
- Protein: 4-6g
- Fat: 4-5g
- Calcium: 10-15% of daily value
- Probiotics: Beneficial bacteria from yogurt
Pro Cheese-Making Tips and Culinary Tricks
- Milk Selection: Use full-fat milk for the creamiest results
- Yogurt Culture: Choose a high-quality, plain yogurt with live cultures
- Lemon Juice: Fresh is always best for optimal curdling
- Straining Technique: Use multiple layers of cheesecloth for smoother cheese
- Flavor Variations: Experiment with different herbs and spices
Recipe Variations and Culinary Adaptations
- Herb-Infused Version: Mix in fresh herbs like dill or za’atar
- Spicy Twist: Add chili flakes or fresh ground pepper
- Garlic Lovers: Incorporate roasted garlic for depth of flavor
- Dairy-Free Option: Experiment with non-dairy milk alternatives
- Sweet Variation: Add honey or maple syrup for a dessert-like spread
Frequently Asked Questions
Q1: How long will homemade yogurt cheese keep? Refrigerated in an airtight container, it will last 5-7 days.
Q2: Can I use store-bought lemon juice? Fresh lemon juice is recommended for best results and flavor.
Q3: What can I do with the leftover whey? Use in baking, smoothies, or as a protein-rich liquid in cooking.
Q4: Is this cheese pasteurized and safe? The cooking process helps ensure safety, but use fresh, quality ingredients.
Q5: How can I tell if my cheese has gone bad? Look for any off smells, mold, or significant change in texture.
Storage and Preservation Strategies
- Refrigeration: Store in an airtight container
- Shelf Life: 5-7 days
- Serving Suggestions: Spread on bread, use as a dip
- Flavor Development: Tastes best when allowed to sit for a few hours
- Freezing: Not recommended due to texture changes
Embark on a culinary journey and discover the simple joy of homemade yogurt cheese!