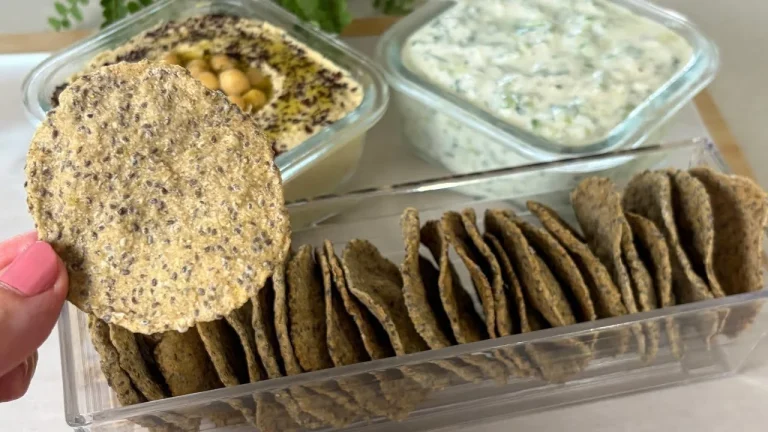
Sometimes, you just want a snack that’s simple, wholesome, and easy to whip up without reaching for flour or processed ingredients. These flourless rosemary chickpea and oat crackers hit that sweet spot perfectly. They’re crisp, fragrant with fresh rosemary, and have a satisfying texture thanks to chickpeas and oats. I’ve found this recipe straightforward but worth a gentle nudge on rolling the dough evenly — thinner crackers turn out just the right level of crispness without burning. Plus, making them from scratch means you control the salt and seasonings. They’re great for an afternoon nibble or paired with cheese and dips when guests drop by.
These crackers are a quietly impressive way to use pantry staples while sneaking in some extra plant-based protein and fiber, hitting that balance between health and flavor without fuss.
Why You’ll Love This Recipe
- Flour-free and naturally gluten-free when using certified gluten-free oats.
- Uses simple pantry ingredients you likely already have.
- The rosemary adds a fresh, aromatic twist that’s both subtle and elegant.
- Crispy texture holds up well for dipping or snacking.
- Easily customizable with herbs and spices.
- Rolling the dough thin and evenly is key for perfect crispness — a practical detail that makes all the difference.
Ingredients
- 1 can (15 oz / 425 g) chickpeas, drained and patted dry
- 1 cup (90 g) rolled oats
- 2 tablespoons (30 ml) olive oil
- 1 tablespoon chopped fresh rosemary (or 1 teaspoon dried)
- 1/2 teaspoon garlic powder
- 1/2 teaspoon salt
- 2 to 4 tablespoons (30 to 60 ml) water
Ingredient Notes
Chickpeas provide protein and a creamy base that binds the crackers without flour. Be sure to pat them dry really well to avoid sogginess. Rolled oats add chew and crunch while keeping the cracker lightweight. Fresh rosemary brightens the flavor, but dried will work fine — just use less, as it’s more potent. Garlic powder lends a savory tone without overpowering. Olive oil helps crisp the crackers and lends richness. Water is added gradually to form a firm but workable dough; too much makes the dough sticky, so add sparingly.
Kitchen Tools Needed
- Food processor or high-powered blender
- Rolling pin
- Baking sheet
- Parchment paper or silicone baking mat
- Sharp knife or pizza cutter
Step-by-Step Instructions
- Preheat your oven to 350°F (175°C). Line a baking sheet with parchment paper or a silicone mat for easy cleanup.
- Add the drained chickpeas, rolled oats, olive oil, rosemary, garlic powder, and salt to your food processor. Pulse until the mixture becomes crumbly but not mushy. You’re aiming for a coarse, sandy texture with some small pea-sized bits — this helps with crispness.
- Transfer the mixture to a mixing bowl. Gradually add 2 tablespoons (30 ml) of water and stir or knead gently. Add more water, a teaspoon at a time, until the dough just comes together in a firm ball. It shouldn’t be sticky or wet.
- Place the dough between two large sheets of parchment paper. Roll it out as thin and even as possible — around 1/8 inch (3 mm) is ideal. Thinner crackers crisp better without burning.
- Carefully peel off the top parchment and use a sharp knife or pizza cutter to score the dough into squares or rectangles. This makes breaking them apart after baking much simpler.
- Transfer the rolled and scored dough with parchment onto your baking sheet. Bake for 25 to 30 minutes until the crackers are golden around the edges and sound crisp when tapped. Keep an eye after 20 minutes to prevent over-browning.
- Remove from the oven and let the crackers cool completely on the baking sheet — they’ll crisp up further as they cool. Break along the scored lines and enjoy.
Pro Tips
- Make sure to pat chickpeas very dry; excess moisture dilutes the dough and makes rolling tricky.
- Rolling evenly thin is key—use a ruler or spacing guide if you have one to keep thickness consistent.
- Don’t skip scoring before baking; it saves time and keeps crackers uniform.
- Let crackers cool fully on the pan for the best crunch — warm crackers can feel soft.
- If your dough feels crumbly, add water little by little; too much will cause sogginess.
- Experiment with other herbs like thyme or oregano for different flavor profiles.
Common Mistakes
- Not drying chickpeas thoroughly can lead to soggy dough.
- Rolling dough too thick means crackers may end up soft or chewy instead of crisp.
- Baking at too high a temperature or too long can burn edges before centers crisp.
- Adding too much water makes rolling difficult and affects final texture.
- Trying to lift crackers off the parchment before fully cooled can cause breakage.
Variations
- Swap rosemary for thyme or sage for a different herbal note.
- Add 1/4 teaspoon smoked paprika or chili flakes for a subtle heat.
- Stir in a tablespoon of nutritional yeast for a cheesy flavor boost.
- Mix in sesame or poppy seeds on top before baking for extra crunch.
Serving Suggestions
These crackers are fantastic on their own or paired with hummus, soft cheeses, or fresh guacamole. They also work well as a base for bruschetta-style toppings or alongside charcuterie boards. Since they hold up well, they’re perfect for packing in lunches or picnics.
Storage Instructions
Store cooled crackers in an airtight container at room temperature for up to 5 days. Keep them away from humidity to maintain crispness. If they soften slightly, a quick re-crisp in the oven helps.
Reheating Tips
Reheating is simple: spread leftover crackers on a baking sheet and warm in a 300°F (150°C) oven for 5 to 7 minutes to refresh their crunch. Watch closely to avoid browning.
Nutrition Estimate (per serving, makes about 12 servings)
- Calories: 80
- Protein: 3 g
- Carbohydrates: 11 g
- Fat: 3.5 g
Recipe Summary
- Prep Time: 10 minutes
- Cook Time: 25–30 minutes
- Total Time: 35–40 minutes
- Servings: About 12
- Cuisine: Healthy snack / Gluten-free option
- Course: Snack
- Calories: Approximately 80 per serving
Frequently Asked Questions
Can I use canned chickpeas that aren’t well-drained?
It’s best to pat them dry thoroughly to remove excess moisture—otherwise, the dough can become too wet.
Are these crackers gluten-free?
Yes, if you use certified gluten-free oats, the recipe is naturally gluten-free.
Can I make the dough ahead of time?
You can refrigerate the dough wrapped in plastic for up to 24 hours before rolling and baking.
What if I don’t have a food processor?
You can mash the chickpeas by hand and pulse the oats roughly in a blender, but the texture may be less even.
Can I freeze the crackers after baking?
It’s better to freeze before baking. Freeze the unbaked dough sheet wrapped in parchment, then bake straight from frozen—add a couple extra minutes to baking time.
These crackers are simple, satisfying, and surprisingly versatile. With just a few humble ingredients working together, they make a lovely homemade snack that’s easy to customize and keep on hand when you want something crisp and savory. They refresh wonderfully with a quick re-heat and hold up well on cheeseboards or packed lunches. Give them a try—you might find they’ll become your go-to dry snack staple.