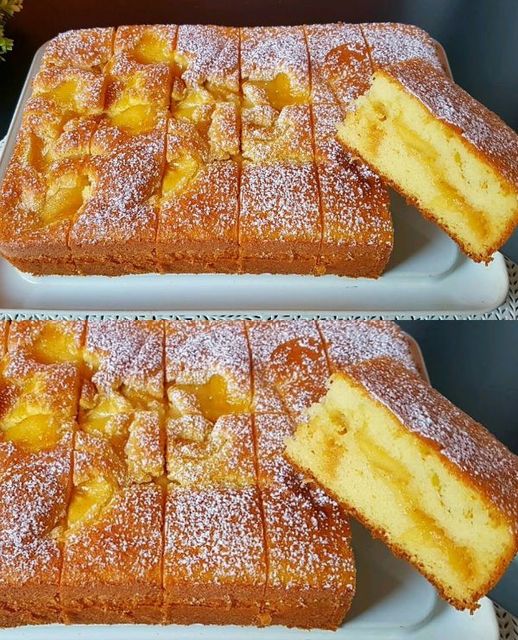
As someone who’s baked thousands of desserts, I can confidently say this quick apple cake is a game-changer. It’s my go-to recipe when I need something impressive but don’t have hours to spend in the kitchen. This cake combines the simplicity of a vanilla base with caramelized apples, creating a dessert that tastes like it came from a high-end bakery.
What makes this recipe truly special is its foolproof nature – I’ve never had it fail, even when I’m in a rush. The secret lies in the perfect ratio of wet to dry ingredients and the magical transformation of simple apples into a caramelized dream.
Why This Recipe Works
- No mixer required – just a whisk and bowl
- Prep-to-table in under 30 minutes
- Uses basic pantry ingredients
- Perfectly balanced sweetness
- Incredibly moist texture
Ingredients
For the Caramelized Apple Topping
- 1 large apple, thinly sliced
- Juice of ½ lemon (about 1 tablespoon)
- 15g (1 tablespoon) butter
- 15g (1 tablespoon) granulated sugar
- Ground cinnamon to taste
- 15g (1 tablespoon) apricot jam
For the Cake Batter
- 3 large eggs, room temperature
- 150g (¾ cup) granulated sugar
- 17g (0.6 oz) vanilla sugar (or 2 teaspoons vanilla extract)
- Pinch of salt
- 120ml (½ cup) vegetable oil
- 160ml (⅔ cup) whole milk
- 240g (2 cups) all-purpose flour
- 20g (2 tablespoons) baking powder
- Powdered sugar for dusting
Step-by-Step Instructions
1. Prepare the Apples (5-7 minutes)
- Slice apple thinly (about 3mm thick) using a sharp knife
- Toss immediately with lemon juice to prevent browning
- Melt butter in a non-stick pan over medium heat
- Add sugar and let it start to caramelize (about 1 minute)
- Add apple slices in a single layer
- Sprinkle with cinnamon
- Cook until golden (about 3-4 minutes)
- Stir in apricot jam until glossy
- Set aside while preparing batter
2. Make the Cake Batter (10 minutes)
- Preheat oven to 180°C (356°F)
- Grease and line a 9-inch round cake pan
- Whisk eggs, sugar, and salt until foamy (about 2 minutes)
- Pour in oil in a steady stream while whisking
- Add milk and vanilla, whisk until combined
- Sift flour and baking powder together
- Fold dry ingredients into wet mixture until just combined
- Pour into prepared pan
- Arrange caramelized apples on top in a circular pattern
3. Bake and Finish (20-25 minutes)
- Bake at 180°C for 20-25 minutes
- Check doneness with a toothpick
- Cool in pan for 5 minutes
- Transfer to wire rack
- Dust with powdered sugar while still warm
Pro Tips for Perfect Results
- Room temperature ingredients are crucial for a tender cake
- Don’t overmix the batter – stop when just combined
- Arrange apples quickly before batter starts setting
- Use firm, tart apples like Granny Smith or Honeycrisp
Serving Suggestions
Serve warm or at room temperature with:
- Vanilla ice cream
- Whipped cream
- Caramel sauce
- Fresh berries
- Coffee or tea
Storage Instructions
- Room temperature: 2 days in an airtight container
- Refrigerator: Up to 5 days
- Freezer: Up to 2 months (without powdered sugar)
Variations
- Add chopped nuts to the batter
- Use pears instead of apples
- Add a teaspoon of cinnamon to the batter
- Drizzle with caramel sauce before serving
Nutritional Information
Per serving (based on 10 servings):
- Calories: 220
- Fat: 8g
- Saturated Fat: 2g
- Cholesterol: 55mg
- Sodium: 180mg
- Carbohydrates: 32g
- Fiber: 1g
- Sugar: 19g
- Protein: 4g
This quick apple cake is perfect for those moments when you need a delicious dessert but don’t have time for complicated recipes. The combination of fluffy vanilla cake and caramelized apples creates an irresistible treat that will have everyone asking for seconds. Whether you’re an experienced baker or just starting out, this foolproof recipe delivers outstanding results every time.
