This incredible no-bake chocolate dessert will revolutionize your approach to homemade treats. Using just six simple ingredients, you can create elegant individual chocolate cups with a crunchy cookie-almond crust and silky smooth ganache filling. Perfect for when you need an impressive dessert without turning on the oven, this recipe delivers bakery-quality results in minimal time with maximum flavor.
Why This No-Bake Chocolate Dessert is Perfect
Traditional chocolate desserts often require lengthy baking times, complex techniques, or hard-to-find ingredients like gelatin. This innovative recipe eliminates all those complications while delivering superior results. The combination of crushed cookies and almonds creates a naturally binding crust that holds its shape perfectly, while the rich chocolate ganache provides the ultimate indulgent filling. No flour means it’s naturally gluten-friendly when using appropriate cookies.
Ingredients
For the Cookie-Almond Crust:
- 200g (7.05 oz) digestive biscuits or graham crackers
- 80g (2.79 oz) raw almonds
- 100g (3.53 oz) unsalted butter, melted
For the Chocolate Ganache:
- 150g (5.29 oz) dark chocolate (60-70% cocoa), chopped
- 90g (3.14 oz) heavy cream
- 7g (0.25 oz) unsalted butter
Equipment Needed:
- Food processor or blender
- Muffin tin or individual dessert molds
- Small saucepan
- Mixing bowls
Step-by-Step Instructions
Preparing the Cookie-Almond Base
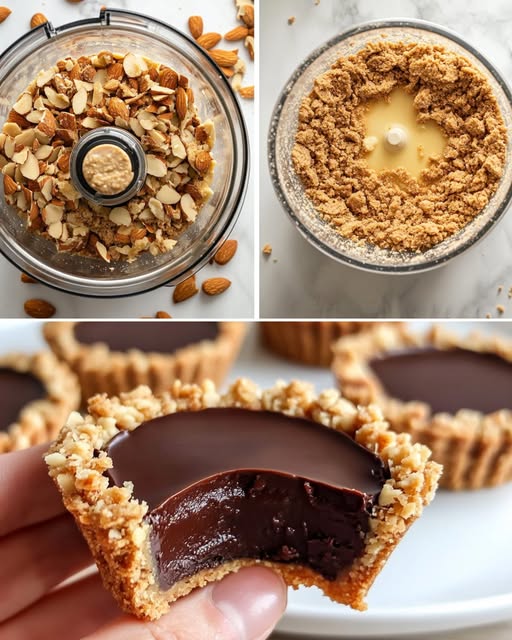
Step 1: Process the Almonds Place the raw almonds in a food processor and pulse until they’re roughly chopped but not powdered. You want a mixture of fine pieces and slightly larger chunks for texture. The almonds should retain some bite while being small enough to bind well with the cookies.
Step 2: Add the Cookies Add the cookies to the food processor with the chopped almonds. Pulse in short bursts until the mixture resembles coarse breadcrumbs with some larger pieces remaining. The texture should be varied, with both fine crumbs and small chunks that will create an interesting mouthfeel.
Step 3: Incorporate the Butter Melt the butter and let it cool slightly to avoid melting the mixture completely. With the food processor running, slowly drizzle in the melted butter until the mixture begins to clump together when pressed. The mixture should hold together when squeezed but not be overly wet.
Step 4: Test the Consistency Take a small handful of the mixture and squeeze it firmly. It should hold together in a compact ball without crumbling apart. If it’s too dry, add a little more melted butter, one teaspoon at a time. If too wet, add a few more crushed cookies.
Forming the Dessert Cups
Step 5: Prepare the Molds Line a muffin tin with paper liners or lightly grease individual dessert molds. You can also use silicone molds for easier removal. This recipe should make 6-8 individual servings depending on the size of your molds.
Step 6: Shape the Bases Divide the cookie-almond mixture evenly among the prepared molds. Using your fingers or the back of a spoon, press the mixture firmly into the bottom of each mold, creating a compact base layer approximately 1cm (½ inch) thick.
Step 7: Create the Walls Continue pressing the mixture up the sides of each mold to create cup-shaped containers. The walls should be sturdy enough to hold the ganache filling. Press firmly to ensure the structure won’t collapse when filled.
Step 8: Chill the Bases Place the formed bases in the refrigerator while you prepare the chocolate ganache. This initial chilling helps the bases set and maintain their shape when the warm ganache is added.
Preparing the Chocolate Ganache
Step 9: Heat the Cream Pour the cream into a small saucepan and heat over medium-low heat until it just begins to simmer. Small bubbles should form around the edges, but don’t let it come to a full boil as this can cause the ganache to break.
Step 10: Prepare the Chocolate While the cream heats, chop the chocolate into small, uniform pieces for even melting. Place the chopped chocolate in a heatproof bowl, ensuring the bowl is completely dry to prevent the chocolate from seizing.
Step 11: Create the Ganache Pour the hot cream over the chopped chocolate and let it sit for 2-3 minutes without stirring. This allows the heat to gently melt the chocolate. After the resting period, stir gently from the center outward until the mixture becomes smooth and glossy.
Step 12: Finish the Ganache Add the small amount of butter to the ganache and stir until completely incorporated. The butter adds extra richness and gives the ganache a beautiful shine. The finished ganache should be smooth, glossy, and coat the back of a spoon.
Final Assembly
Step 13: Fill the Cups Remove the chilled cookie bases from the refrigerator. Carefully spoon or pour the warm ganache into each cup, filling them nearly to the top. The contrast between the cool, set base and warm ganache creates the perfect texture combination.
Step 14: Level and Smooth Gently tap the molds on the counter to level the ganache and eliminate any air bubbles. Use a small offset spatula or the back of a spoon to smooth the surface if needed.
Step 15: Final Chill Return the filled dessert cups to the refrigerator and chill for at least 2 hours, or until the ganache is completely set. For firmer results, chill for 4 hours or overnight.
Nutritional Information and Timing
Preparation Time: 20 minutes Chilling Time: 2-4 hours Total Time: 2 hours 20 minutes to 4 hours 20 minutes Serves: 6-8 people Calories per serving: Approximately 385 calories
Nutritional Benefits: Each serving provides healthy fats from almonds and dark chocolate, along with antioxidants from cocoa. The almonds contribute protein, vitamin E, and magnesium, while dark chocolate offers flavonoids that support heart health.
Recipe Variations and Substitutions
Gluten-Free Version: Use certified gluten-free cookies or substitute with crushed gluten-free oats mixed with a tablespoon of cocoa powder for binding.
Nut-Free Alternative: Replace almonds with toasted seeds like sunflower or pumpkin seeds, or use additional cookies for a simpler base.
Flavor Variations: Add orange zest to the ganache for chocolate-orange cups, or incorporate a tablespoon of liqueur like rum, coffee liqueur, or amaretto for adult versions.
Different Chocolates: Experiment with milk chocolate for sweeter results or white chocolate for an elegant variation, adjusting cream quantities as needed for proper consistency.
Vegan Adaptation: Use vegan butter and coconut cream instead of dairy cream, ensuring your chocolate and cookies are also vegan-friendly.
Serving and Presentation Tips
These elegant dessert cups can be served directly in their molds for casual dining or carefully removed for more formal presentation. Garnish with fresh berries, a sprinkle of sea salt, chopped nuts, or a dollop of whipped cream. For special occasions, dust with edible gold powder or drizzle with contrasting chocolate.
Storage and Make-Ahead Benefits
These desserts are perfect for entertaining as they can be made 1-2 days in advance. Store covered in the refrigerator and bring to room temperature for 10-15 minutes before serving for optimal texture. They can also be frozen for up to one month, though the texture may be slightly different when thawed.
Professional Tips for Success
The key to perfect results lies in achieving the right consistency for both components. The cookie base should be moist enough to hold together but not so wet that it becomes soggy. The ganache should be smooth and glossy without any graininess, which can occur if the cream is too hot or if water gets into the chocolate.
Frequently Asked Questions
Can I use different types of cookies for the base? Absolutely! Graham crackers, digestive biscuits, vanilla wafers, or even chocolate cookies work well. Each will create a slightly different flavor profile. Avoid cookies that are too sweet if using sweet chocolate for the ganache.
What if my ganache becomes grainy or separates? Grainy ganache usually results from overheating or water contamination. To fix it, gradually whisk in a tablespoon of warm cream until smooth. Prevention involves using dry utensils and not overheating the cream.
How do I know when the desserts are properly set? The ganache should be firm to the touch and not leave an impression when lightly pressed. The surface should look matte rather than glossy, indicating it has fully set.
Can I make larger or smaller portions? Yes, adjust the mold size accordingly. Larger portions may need additional chilling time, while smaller ones will set more quickly. The recipe scales well for different serving sizes.
What’s the best way to remove the desserts from the molds? If using paper liners, simply peel them away. For rigid molds, briefly dip the bottom in warm water for 5-10 seconds, then invert onto a serving plate. Silicone molds usually release easily with gentle pressure.
This remarkable no-bake chocolate dessert proves that impressive results don’t always require complicated techniques or lengthy preparation times. The combination of crunchy, nutty base and silky smooth chocolate ganache creates a textural contrast that’s both sophisticated and satisfying. Whether you’re entertaining guests or simply treating yourself to something special, these elegant chocolate cups deliver bakery-quality results with home kitchen simplicity.