
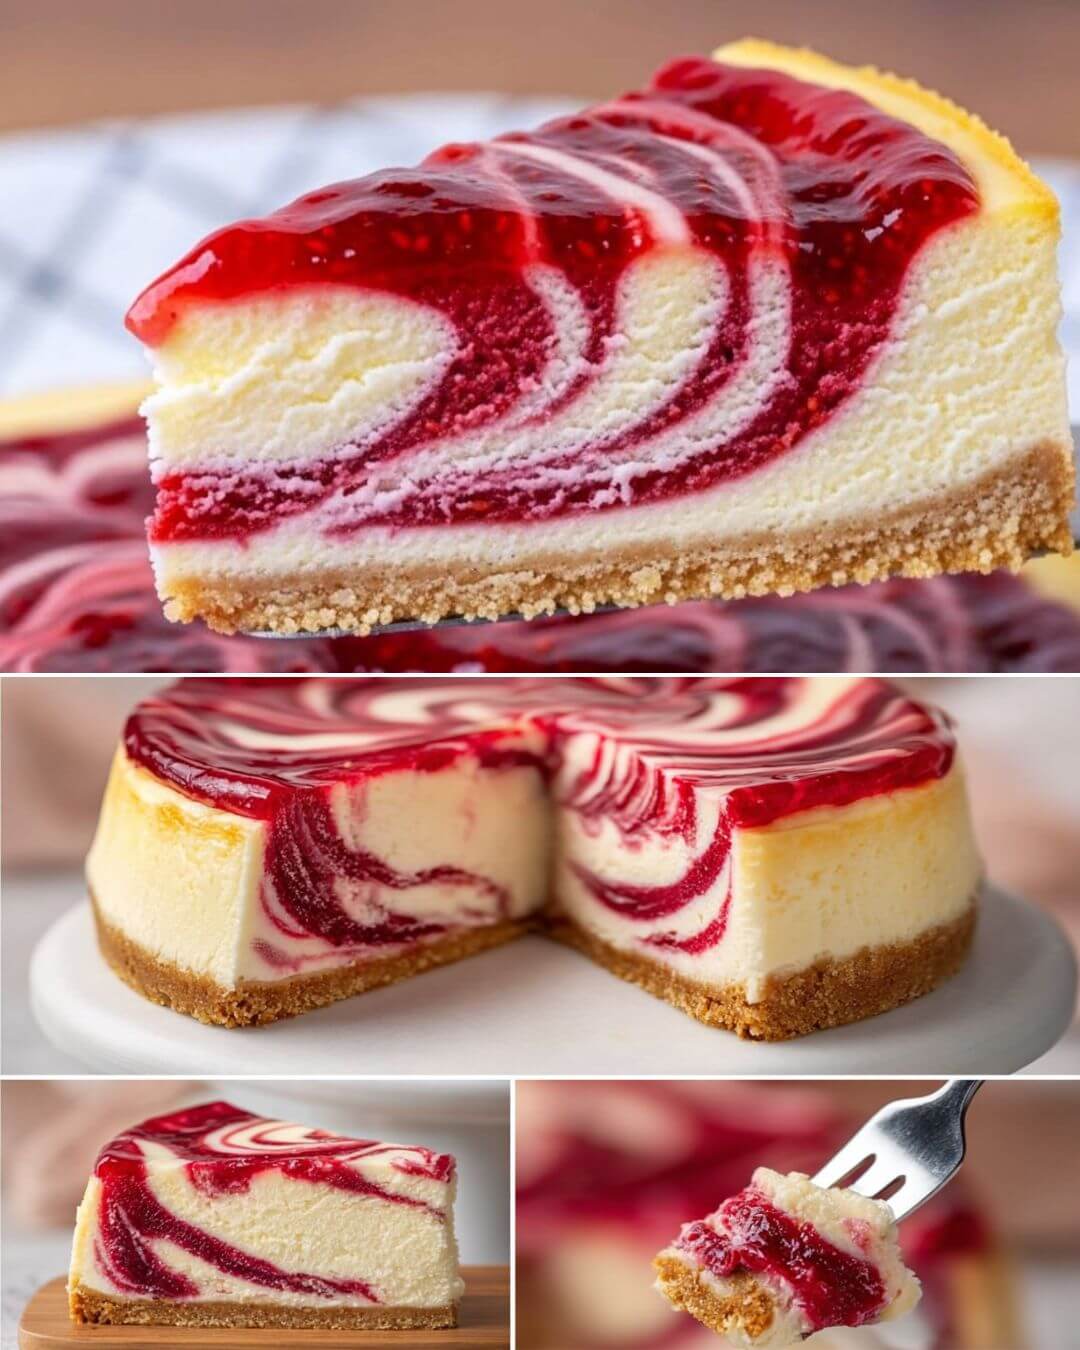
Stunning Raspberry Zebra Cheesecake
Prepare to be amazed by this show-stopping raspberry zebra cheesecake that looks like it came from a fancy bakery but is surprisingly simple to make at home. The beautiful marbled pattern isn’t just for looks—it delivers alternating bites of creamy vanilla cheesecake and tangy raspberry swirls, all sitting on a buttery biscuit crust and topped with a glossy raspberry glaze. This elegant dessert is perfect for special occasions, dinner parties, or any time you want to impress your guests with both stunning presentation and incredible flavor.
Ingredients
For the Biscuit Crust:
- 150g/5.3 oz digestive biscuits or graham crackers, finely crushed (about 1½ cups crumbs)
- 70g/5 tablespoons butter, melted
For the Raspberry Swirl:
- 300g/2 cups fresh or frozen raspberries
- 80g/⅓ cup plus 1 tablespoon sugar
- 120ml/½ cup water
- 10g/1 tablespoon cornstarch
- 2 tablespoons water for cornstarch slurry
For the Cheesecake Filling:
- 500g/2¼ cups cream cheese, at room temperature
- 90g/6 tablespoons sour cream or Greek yogurt
- 150g/¾ cup sugar
- 1 teaspoon vanilla paste or vanilla extract
- 25g/2½ tablespoons cornstarch
- 3 large eggs, at room temperature
- 20g/2½ tablespoons cornstarch for stabilizing
For the Raspberry Glaze:
- 100g/¾ cup fresh or frozen raspberries
- 30g/2 tablespoons sugar
- 3g/1 teaspoon powdered gelatin
- 2 tablespoons cold water for gelatin
- 2-3 tablespoons water for cooking
Additional:
- Butter for greasing the pan
- Aluminum foil for water bath
Instructions
Prepare the Crust:
Preheat your oven to 160°C/320°F. Place the digestive biscuits in a food processor and pulse until you have fine crumbs, or place them in a sealed plastic bag and crush with a rolling pin. Transfer the crumbs to a bowl. Melt the butter in the microwave for 30-40 seconds until completely liquid. Pour the melted butter over the biscuit crumbs and mix thoroughly with a fork until all the crumbs are moistened and the mixture resembles wet sand. Grease a 20cm/8-inch springform pan with butter. Press the biscuit mixture firmly into the bottom of the pan, using the back of a spoon or the bottom of a glass to create an even, compact layer. Bake the crust for 7 minutes at 160°C/320°F. Remove from the oven and let it cool while you prepare the filling.
Make the Raspberry Swirl:
In a medium saucepan, combine the raspberries, sugar, and 120ml water. Place over medium heat and bring to a gentle simmer, stirring occasionally. Cook for about 5 minutes, crushing the raspberries with the back of a spoon as they soften. In a small bowl, mix the cornstarch with 2 tablespoons of water to create a smooth slurry. Pour the cornstarch mixture into the raspberry sauce and stir constantly for 1-2 minutes until the mixture thickens noticeably. Remove from heat and strain the mixture through a fine-mesh sieve to remove the seeds, pressing down with a spoon to extract all the liquid. Cover the raspberry sauce with aluminum foil or plastic wrap, pressing it directly onto the surface to prevent a skin from forming. Let it cool completely to room temperature.
Prepare the Cheesecake Filling:
In a large mixing bowl, beat the cream cheese with an electric mixer on medium speed for 2-3 minutes until smooth and creamy with no lumps. Add the sour cream or Greek yogurt and continue beating until well incorporated. Add the sugar and vanilla paste, beating for another 2 minutes until the mixture is light and fluffy. Add the cornstarch and mix until just combined. Add the eggs one at a time, beating on low speed after each addition just until incorporated. Don’t overmix after adding the eggs, as this can incorporate too much air and cause cracks. The filling should be smooth and creamy.
Prepare the Pan for Water Bath:
Wrap the outside of your springform pan completely with two layers of heavy-duty aluminum foil, making sure it comes up the sides of the pan to prevent water from seeping in. Place the wrapped springform pan inside a larger roasting pan or baking dish. This will be your water bath setup.
Create the Zebra Pattern:
Pour about one-third of the plain cheesecake filling into the prepared crust, spreading it evenly. Drizzle 2-3 tablespoons of the cooled raspberry sauce over the cheesecake filling in a random pattern. Use a knife or toothpick to gently swirl the raspberry sauce into the cheesecake filling, creating a marbled effect. Don’t overmix—you want distinct stripes and swirls. Add another layer of plain cheesecake filling, then another layer of raspberry sauce, and swirl again. Repeat this layering and swirling process until all the filling and raspberry sauce are used, ending with a final swirl on top. Tap the pan gently on the counter a few times to release any air bubbles.
Bake the Cheesecake:
Place a kitchen towel or paper towels in the bottom of the larger pan to prevent the springform pan from sliding. Carefully pour hot water into the larger pan until it reaches about halfway up the sides of the springform pan, being very careful not to get any water inside the aluminum foil wrapping. Place the entire setup in the preheated 160°C/320°F oven. Bake for 60 minutes. The cheesecake should be set around the edges but still have a slight wobble in the center. After 60 minutes, turn off the oven but leave the cheesecake inside with the door closed for 1 hour. This gradual cooling prevents cracks from forming.
Cool the Cheesecake:
After the 1-hour resting period in the oven, remove the cheesecake from the water bath and carefully remove the aluminum foil. Let the cheesecake cool to room temperature on a wire rack for about 1 hour. Once at room temperature, cover the cheesecake with plastic wrap and refrigerate for at least 4 hours or preferably overnight. This chilling time allows the cheesecake to set completely and the flavors to develop.
Prepare the Raspberry Glaze:
When you’re ready to serve, make the glaze. Place the cold water in a small bowl and sprinkle the gelatin over it. Let it sit for 5 minutes to bloom and soften. In a small saucepan, combine the raspberries, sugar, and 2-3 tablespoons of water. Heat over medium heat, stirring and crushing the raspberries as they soften. Once the mixture is simmering, remove from heat and add the bloomed gelatin. Stir continuously until the gelatin is completely dissolved, about 1 minute. Do not let the mixture boil after adding the gelatin. Strain the glaze through a fine-mesh sieve to remove the seeds. Let the glaze cool for 10-15 minutes until it’s slightly thickened but still pourable.
Glaze and Serve:
Run a thin knife around the edge of the chilled cheesecake to loosen it from the pan. Carefully remove the springform ring. Pour the raspberry glaze over the top of the cheesecake, using a spatula to spread it evenly to the edges, allowing some to drip down the sides naturally. Refrigerate for another 30 minutes to set the glaze. Slice with a sharp knife, wiping the blade clean between cuts for neat slices. Serve chilled and enjoy.
Time & Servings
Prep Time: 40 minutes
Cooking Time: 67 minutes
Cooling & Chilling Time: 6 hours
Total Time: 7 hours 47 minutes
Servings: 10-12 slices
Nutrition per serving: Approximately 385 calories, 7g protein, 38g carbohydrates, 23g fat, 2g fiber
Why This Recipe Works
This raspberry zebra cheesecake combines indulgence with some nutritional benefits that make it more than just a treat. Cream cheese provides protein and calcium essential for bone health, while the eggs add high-quality protein and important nutrients like choline for brain function. The raspberries are true nutritional stars, packed with antioxidants called anthocyanins that give them their vibrant red color and may help reduce inflammation and support heart health. Raspberries are also rich in vitamin C, which supports immune function and skin health, and they provide dietary fiber for digestive health. Greek yogurt or sour cream adds probiotics that support gut health and additional protein. The water bath baking method ensures a creamy, crack-free texture by providing gentle, even heat and preventing the top from drying out. While this is certainly a dessert to enjoy in moderation due to its sugar and fat content, the inclusion of fruit and dairy means you’re getting real nutrients alongside the indulgence. The stunning visual presentation encourages mindful eating—you’ll want to savor each beautiful slice slowly, which can lead to greater satisfaction and enjoyment.