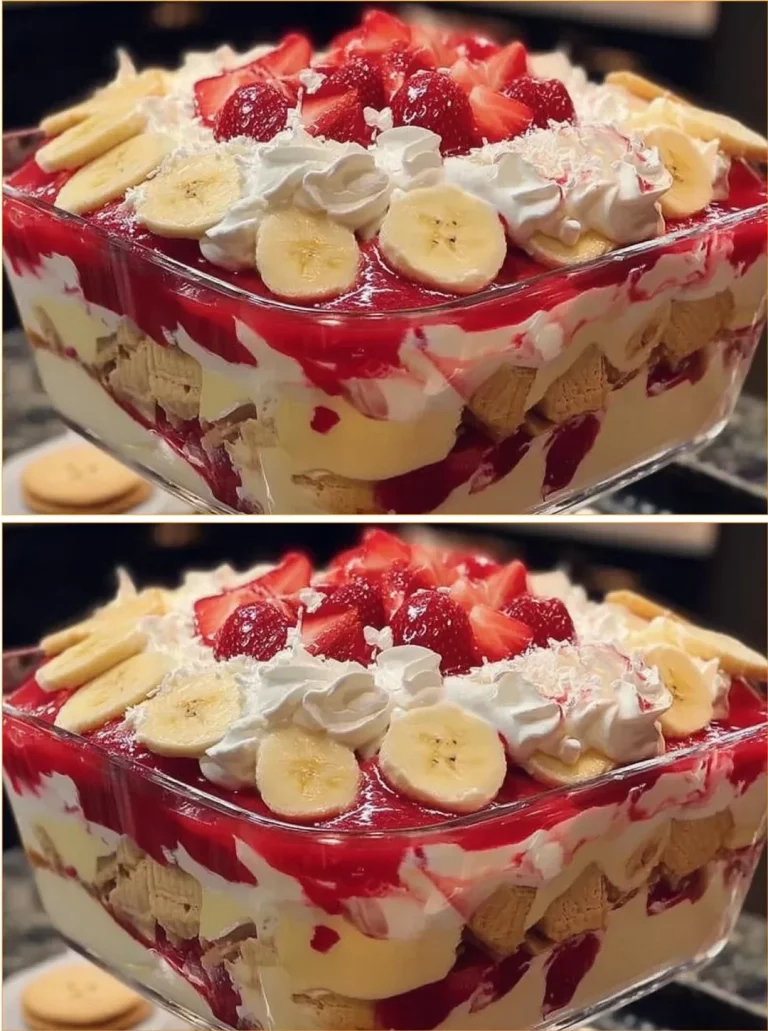
Strawberry Banana Pudding Dream is the perfect dessert that combines the creamy goodness of pudding with the sweetness of ripe bananas and strawberries. This delightful treat is not only easy to make but also incredibly refreshing, making it a hit at family gatherings, picnics, or simply when you’re craving something sweet. The layers of vanilla wafers, fresh fruit, and fluffy whipped topping create a beautiful presentation that is sure to impress your guests. Plus, it’s a quick fix that will have everyone asking for seconds!
What You’ll Need for Strawberry Banana Pudding Dream
To create this delightful dessert, you’ll need a few simple ingredients that come together to create layers of flavor and texture. Here’s your shopping list:
- 2 boxes Vanilla Wafers
- 6 to 8 bananas, sliced
- 2 cups milk (480 ml)
- 1 container strawberries, sliced
- 1 (5 oz.) box French Vanilla pudding
- 1 (8 oz.) package cream cheese, softened
- 1 (14 oz.) can sweetened condensed milk
- 1 (12 oz.) container whipped topping
How to Make Strawberry Banana Pudding Dream
Now that you have gathered all your ingredients, it’s time to whip up this delicious dessert! Just follow these easy steps:
-
Mix Cream Cheese and Milk: In a mixing bowl, combine the softened cream cheese and sweetened condensed milk. Mix until smooth and creamy.
-
Add Pudding and Milk: Stir in the French Vanilla pudding and the milk. Continue to mix until all ingredients are well combined and smooth.
-
Layer the Ingredients: In a large serving dish, start by layering the vanilla wafers at the bottom.
-
Fruit Layers: On top of the wafers, add a layer of sliced bananas, followed by a layer of sliced strawberries.
-
First Pudding Layer: Pour half of the pudding mixture evenly over the fruit and wafers.
-
Repeat Layers: Repeat the process with another layer of vanilla wafers, followed by the remaining bananas and strawberries. Finish with the rest of the pudding mixture on top.
-
Whipped Topping: Spread the whipped topping over the final layer of pudding, smoothing it out as you go.
-
Chill Before Serving: Cover the dish and refrigerate for at least 4 hours (or overnight for best results) to allow the flavors to meld together.
Serve & Enjoy Strawberry Banana Pudding Dream
When you’re ready to serve, take the Strawberry Banana Pudding Dream out of the fridge. This dessert can be enjoyed right out of the dish, or for a lovely presentation, you can use a large spoon to serve individual portions into bowls. You might want to garnish each serving with a few slices of fresh strawberry or banana for that extra touch.
If you’re looking for a beverage pairing, a glass of chilled lemonade or iced tea goes perfectly with this sweet indulgence!
Expert Tips for Strawberry Banana Pudding Dream
-
Make it Ahead of Time: This dessert can be made a day in advance. Just remember to keep it covered in the fridge so it stays fresh.
-
Use Fresh Fruit: For the best flavor, use ripe bananas and sweet strawberries. You can also experiment with other fruits like peaches or raspberries.
-
Add Crunch: If you want a little extra crunch, consider adding chopped nuts or crushed wafers on top of the whipped topping before serving.
Strawberry Banana Pudding Dream FAQs
Can I use other flavors of pudding?
Yes! While French Vanilla is delicious, you can experiment with different flavors like banana or cheesecake pudding for a unique twist.
How long does this dessert last in the fridge?
Strawberry Banana Pudding Dream is best enjoyed within 3 to 4 days when stored in the refrigerator.
Can I make this dessert gluten-free?
Absolutely! Just look for gluten-free vanilla wafers, and you’ll have a delicious dessert that everyone can enjoy.
This Strawberry Banana Pudding Dream is a delight for the taste buds and a feast for the eyes. Try it out for your next gathering, and I guarantee it will become a favorite among friends and family. Happy cooking!

Strawberry Banana Pudding Dream
Ingredients
Method
- In a mixing bowl, combine the softened cream cheese and sweetened condensed milk. Mix until smooth and creamy.
- Stir in the French Vanilla pudding and the milk. Continue to mix until all ingredients are well combined and smooth.
- In a large serving dish, start by layering the vanilla wafers at the bottom.
- On top of the wafers, add a layer of sliced bananas, followed by a layer of sliced strawberries.
- Pour half of the pudding mixture evenly over the fruit and wafers.
- Repeat the process with another layer of vanilla wafers, followed by the remaining bananas and strawberries. Finish with the rest of the pudding mixture on top.
- Spread the whipped topping over the final layer of pudding, smoothing it out as you go.
- Cover the dish and refrigerate for at least 240 minutes (or overnight for best results) to allow the flavors to meld together.
- When you’re ready to serve, take the Strawberry Banana Pudding Dream out of the fridge. You can serve it directly from the dish or use a large spoon to serve individual portions into bowls.
- Garnish each serving with a few slices of fresh strawberry or banana if desired.