Create bakery-quality fresh bread in just 5 minutes of hands-on time with this simple yet effective recipe. This quick bread method produces a beautifully golden loaf with a soft interior and crusty exterior that rivals traditional artisan breads, making it perfect for busy home bakers who want fresh bread without the lengthy process.
Ingredients
For the Bread Dough:
- 350g (2¾ cups / 12.3 oz) wheat flour, sieved
- 1 teaspoon (4g) granulated sugar
- 1 teaspoon (5g) salt, or to taste
- 5g (1¾ teaspoons) active dry yeast
- 210ml (¾ cup + 2 tablespoons / 7 fl oz) boiled water, cooled to lukewarm
- 30ml (2 tablespoons / 1 fl oz) vegetable oil
- Additional flour for dusting
For Finishing:
- 2-3 tablespoons whole milk for brushing
- 1 tablespoon (15g) unsalted butter, melted
- Extra flour for dusting work surface
Step-by-Step Instructions
Preparing the Yeast Mixture
Begin by ensuring your boiled water has cooled to lukewarm temperature, approximately 37-40°C (98-104°F). Water that’s too hot will kill the yeast, while water that’s too cool won’t activate it properly. Test the temperature by dropping a small amount on your wrist – it should feel comfortably warm, not hot.
In a small bowl, combine the lukewarm water with the sugar and stir until dissolved. Sprinkle the dry yeast over the surface and let it sit for 3-5 minutes until it becomes frothy and bubbly. This proofing step confirms that your yeast is active and will help your bread rise properly.
Creating the Dough
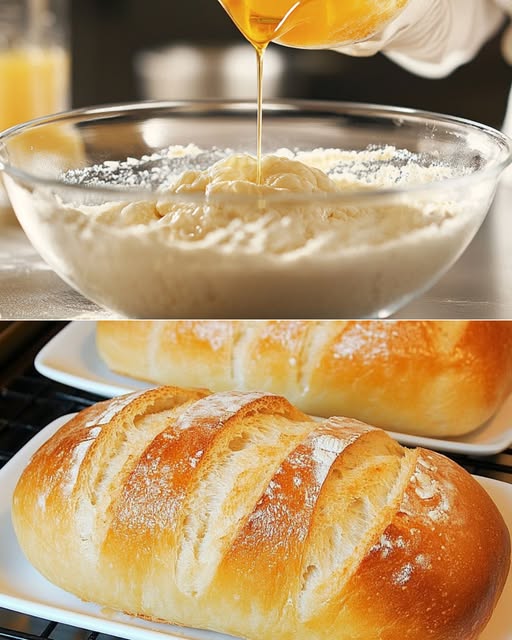
In a large mixing bowl, combine the sieved wheat flour and salt, whisking them together to ensure even distribution. Create a well in the center of the flour mixture and pour in the activated yeast mixture along with the vegetable oil.
Using a wooden spoon or your hands, mix the ingredients together until they form a cohesive dough. The mixture will initially appear shaggy but will come together as you continue mixing. Once the dough holds together, turn it out onto a lightly floured surface.
Kneading and Shaping
Knead the dough for 3-4 minutes until it becomes smooth and elastic. The dough should be soft but not sticky – if it sticks to your hands, dust with a small amount of flour. The quick kneading time is sufficient due to the optimized flour-to-liquid ratio and the active yeast.
Shape the dough into an oval loaf by gently stretching and folding it under itself. Place the shaped loaf on a parchment-lined baking sheet, seam side down. Using a sharp knife or razor blade, make 4-5 diagonal cuts across the top of the loaf, approximately 1cm (½ inch) deep. These cuts will create the characteristic scored pattern and allow the bread to expand properly during baking.
Final Rise and Preparation
Cover the shaped loaf with a clean kitchen towel and let it rise in a warm, draft-free location for 15-20 minutes. The bread should increase in size by about 50% during this brief rising period.
While the bread rises, preheat your oven to 220°C (425°F). Place an empty metal pan on the bottom rack of the oven – this will be used to create steam for a crispy crust.
Baking Process
Just before baking, brush the top of the loaf gently with milk using a pastry brush. This will give the bread a beautiful golden color and soft texture on the surface. Dust lightly with flour for an authentic artisan appearance.
Carefully transfer the baking sheet to the middle rack of the preheated oven. Immediately pour 1 cup of hot water into the empty pan on the bottom rack to create steam, then quickly close the oven door. This steam helps develop a crispy, professional-quality crust.
Bake for 25-30 minutes until the bread is golden brown and sounds hollow when tapped on the bottom. The internal temperature should reach 190°C (375°F) when measured with a digital thermometer.
Finishing and Cooling
Remove the bread from the oven and immediately brush the hot surface with melted butter. This adds flavor and keeps the crust from becoming too hard as it cools. Transfer the bread to a wire cooling rack and allow it to cool for at least 15 minutes before slicing.
The bread is best enjoyed warm but can be stored at room temperature for up to 3 days when properly wrapped.
Nutritional Information
Per serving (makes 8 servings):
- Calories: 185
- Protein: 5g
- Carbohydrates: 35g
- Fat: 4g
- Fiber: 2g
- Sugar: 1g
- Sodium: 295mg
Active Preparation Time: 5 minutes Rising Time: 15-20 minutes Baking Time: 25-30 minutes Total Time: 45-55 minutes Servings: 8 slices
Recipe Variations and Substitutions
Flour Alternatives
Replace up to half the wheat flour with whole wheat flour for added nutrition and nutty flavor. Bread flour can substitute all-purpose flour for a chewier texture and better rise. For those avoiding gluten, use a high-quality gluten-free bread flour blend, though results may vary.
Flavor Enhancements
Add 1 tablespoon of mixed herbs like rosemary, thyme, or oregano to the flour for an aromatic herb bread. Incorporate 2 tablespoons of seeds such as sunflower, sesame, or poppy seeds for added texture and nutrition.
Sweet Variations
Transform this into a slightly sweet breakfast bread by increasing the sugar to 2 tablespoons and adding 1 teaspoon of vanilla extract or cinnamon to the dough.
Oil Substitutions
Olive oil can replace vegetable oil for a more complex flavor profile, particularly delicious with herb additions. Melted butter can also be used, though it will create a slightly richer, more tender crumb.
Shape Variations
Instead of an oval loaf, divide the dough into 6-8 portions and shape into dinner rolls. Reduce baking time to 15-18 minutes for perfectly portioned individual servings.
Crust Alternatives
For a softer crust, brush with melted butter both before and after baking. For a shinier, more golden crust, use an egg wash made from one beaten egg mixed with 1 tablespoon of milk instead of plain milk.
Frequently Asked Questions
Why is my bread dense instead of light and airy?
Dense bread typically results from inactive yeast, over-kneading, or using water that was too hot. Ensure your yeast foams during proofing and that your water temperature doesn’t exceed 40°C (104°F). Also, avoid adding too much flour during kneading.
Can I make this bread without the steam method?
While the steam creates a better crust, you can skip this step if preferred. The bread will still be delicious but may have a slightly softer, less crispy exterior. You can also spray the oven walls with water just after placing the bread inside.
How do I know when the bread is fully baked?
The bread should be golden brown and sound hollow when tapped on the bottom. An instant-read thermometer inserted into the center should read 190°C (375°F). Underbaked bread will sound dull when tapped and feel heavy.
Can I prepare the dough in advance?
The dough can be prepared and shaped, then refrigerated overnight for a slow, cold rise. Remove from refrigeration 30 minutes before baking and proceed with the recipe. This method actually improves flavor development.
What’s the best way to store leftover bread?
Store completely cooled bread in a paper bag at room temperature for 2-3 days to maintain crust texture. For longer storage, wrap in plastic and freeze for up to 3 months. Refresh day-old bread by warming in a 180°C (350°F) oven for 5-10 minutes.
This 5-minute fresh bread recipe revolutionizes home baking by proving that exceptional bread doesn’t require hours of preparation. The combination of proper technique, optimal ingredient ratios, and strategic timing creates a loaf that’s crispy on the outside, tender on the inside, and incredibly satisfying to make. Whether you’re a beginner baker or an experienced cook looking for a quick bread solution, this recipe delivers consistent, delicious results every time.