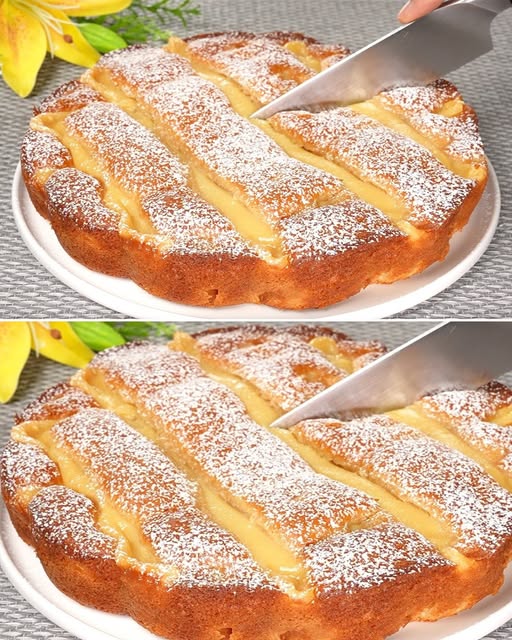
This incredible apple pie with cream combines the comfort of traditional baking with the elegance of a custard-filled dessert. The secret lies in the three-layer approach: a tender, moist cake base, perfectly spiced sautéed apples, and a silky vanilla pudding that creates an irresistible combination. This recipe transforms even ordinary apples into something extraordinary, making it perfect for any season.
Ingredients
For the Cake Base:
- 3 large eggs, room temperature
- 100g (3.5 oz / ½ cup) granulated sugar
- 1 teaspoon vanilla essence
- 60ml (2 fl oz / ¼ cup) vegetable oil (sunflower oil preferred)
- 90g (3 oz / ⅓ cup) natural yogurt
- 270g (9.5 oz / 2¼ cups) all-purpose flour
- 10g (0.35 oz / 2 teaspoons) baking powder
For the Sautéed Apples:
- 4 medium apples (any variety), peeled and sliced
- 60g (2 oz / 4 tablespoons) unsalted butter
- 60g (2 oz / ¼ cup) granulated sugar
- Juice of 1 medium lemon (about 2 tablespoons)
For the Vanilla Pudding:
- 1 large egg
- 45g (1.5 oz / 3 tablespoons) granulated sugar
- 1 teaspoon vanilla essence
- 20g (0.7 oz / 1 tablespoon) cornstarch
- 240ml (8 fl oz / 1 cup) whole milk
For Assembly and Decoration:
- 1 teaspoon powdered sugar for dusting
- Butter for greasing the pan
- Baking paper for lining
Step-by-Step Instructions
Preparing the Sautéed Apples
Begin by preparing the apples, which form the heart of this dessert. Peel and core the apples, then slice them into uniform wedges about ¼-inch thick. Consistency in size ensures even cooking and prevents some pieces from becoming mushy while others remain undercooked.
Heat a large skillet over medium heat and add the butter, allowing it to melt completely and begin to foam slightly. Add the sliced apples to the pan in a single layer if possible, working in batches if necessary to avoid overcrowding. The key to perfect sautéed apples is giving them enough space to caramelize rather than steam.
Sprinkle the sugar evenly over the apples and cook without stirring for the first 3-4 minutes to allow the bottom surfaces to develop a golden color. Gently stir or flip the apple slices and continue cooking for another 4-6 minutes until they’re tender but still hold their shape.
Add the fresh lemon juice during the last minute of cooking, which brightens the flavor and prevents the apples from becoming overly sweet. The lemon juice also helps maintain the apples’ structure and adds a subtle tartness that balances the sweetness perfectly. Remove from heat and set aside to cool while you prepare the other components.
Making the Vanilla Pudding
The homemade pudding elevates this dessert from simple to sublime. In a medium saucepan, whisk together the egg and sugar until the mixture becomes pale and slightly thick, about 2 minutes of vigorous whisking. This step is crucial for preventing the egg from scrambling when the hot milk is added.
Add the vanilla essence and cornstarch to the egg mixture, whisking until completely smooth with no lumps visible. Cornstarch lumps will create an unpleasant texture in the finished pudding, so take time to ensure complete incorporation.
In a separate small saucepan, heat the milk over medium heat until it just begins to steam and small bubbles form around the edges. Do not allow it to boil, as this can cause the pudding to curdle when combined with the egg mixture.
Very slowly pour about one-third of the hot milk into the egg mixture while whisking constantly. This process, called tempering, gradually raises the temperature of the eggs without cooking them. Continue adding the remaining milk in a slow, steady stream while whisking continuously.
Return the entire mixture to the saucepan and cook over medium-low heat, stirring constantly with a whisk or wooden spoon. The pudding will gradually thicken and should coat the back of a spoon when ready, typically taking 5-8 minutes. The consistency should be smooth and creamy, similar to thick custard.
Remove from heat immediately once thickened and press plastic wrap directly onto the surface of the pudding to prevent a skin from forming. Allow to cool completely before using.
Preparing the Cake Batter
Preheat your oven to 180°C (355°F). Generously butter a 23cm (9-inch) round springform pan and line the bottom with baking paper. The combination of butter and parchment ensures easy removal of the finished cake.
In a large mixing bowl, beat the eggs and sugar together using an electric mixer or vigorous hand whisking until the mixture becomes pale, fluffy, and significantly increased in volume. This should take 3-4 minutes with an electric mixer or 6-8 minutes by hand. Proper aeration at this stage creates the tender texture that makes this cake special.
Add the vanilla essence and mix briefly to incorporate. In a separate small bowl, whisk together the vegetable oil and yogurt until smooth. The yogurt adds moisture and tenderness while the oil ensures the cake stays moist for days.
Gradually add the oil and yogurt mixture to the beaten eggs, mixing gently to maintain the air you’ve incorporated. Over-mixing at this stage can result in a dense cake.
In another bowl, sift together the flour and baking powder. Sifting ensures even distribution of the leavening agent and eliminates any lumps that could create dense spots in the finished cake.
Add the flour mixture to the wet ingredients in three additions, folding gently with a large spoon or rubber spatula just until combined. The batter should be smooth but avoid over-mixing, which develops gluten and creates a tough texture.
Assembly and Baking
Pour the cake batter into the prepared pan and spread evenly with an offset spatula. Arrange the cooled sautéed apples over the surface of the batter, distributing them evenly and pressing them slightly into the batter so they don’t sink completely but remain partially visible.
Using a large spoon, dollop the cooled vanilla pudding over the apples and batter. Don’t worry about perfect coverage, as the pudding will spread slightly during baking and create beautiful marbled patterns throughout the cake.
Bake for 45 minutes or until the top is golden brown and a toothpick inserted into the cake portion (avoiding the pudding areas) comes out with just a few moist crumbs attached. The center should be set but still slightly soft to the touch.
Allow the cake to cool in the pan for 15 minutes before carefully removing the sides of the springform pan. Cool completely on a wire rack before serving to allow all the flavors to meld and the pudding to set properly.
Just before serving, dust the top lightly with powdered sugar using a fine-mesh sieve for an elegant presentation.
Nutritional Information and Timing
Per serving (12 servings):
- Calories: 285
- Carbohydrates: 42g
- Protein: 6g
- Fat: 11g
- Fiber: 2g
- Sugar: 24g
- Calcium: 95mg
- Vitamin C: 8mg
Timing Breakdown:
- Prep time: 30 minutes
- Cooking time: 45 minutes
- Total time: 1 hour 15 minutes
- Cooling time: 1 hour
- Best served: 2-3 hours after baking
Recipe Variations and Substitutions
Apple Variety Adaptations
While any apple variety works with this recipe, different types create distinct flavor profiles. Granny Smith apples provide tartness that balances the sweet pudding, while Honeycrisp or Gala apples create a mellower, sweeter result. For the best texture, choose apples that hold their shape when cooked, avoiding varieties like Red Delicious that become mushy.
During peak apple season, try mixing varieties for complexity. A combination of tart and sweet apples creates the most interesting flavor profile. If your apples are particularly tart, reduce the lemon juice slightly, or if they’re very sweet, add an extra squeeze of lemon.
Dairy Alternatives
The yogurt in the cake can be substituted with sour cream for extra richness or buttermilk for increased tenderness. Greek yogurt works well but may create a denser texture, so thin it slightly with milk if using. For dairy-free versions, use coconut yogurt and plant-based milk in the pudding, though the texture may vary slightly.
Flavor Enhancements
Add warm spices to complement the apples by incorporating ½ teaspoon ground cinnamon and ¼ teaspoon nutmeg into the flour mixture. A pinch of cardamom or allspice can add sophisticated complexity. For adult gatherings, add 1 tablespoon of rum or brandy to the sautéed apples during the last minute of cooking.
Seasonal Variations
This recipe adapts beautifully to other fruits. Pears work exceptionally well, requiring the same cooking method as apples. Stone fruits like peaches or plums create summer versions, though they may need slightly less cooking time. Berries can be added fresh without pre-cooking, scattered over the batter along with the other fruit.
Frequently Asked Questions
Can I make this cake ahead of time? This cake actually improves with time as the flavors meld and the moisture from the apples and pudding creates an even more tender texture. It can be made up to 2 days in advance and stored covered at room temperature. The pudding layer may absorb slightly into the cake, creating an even more integrated flavor profile.
Why do my apples need to be pre-cooked? Pre-cooking the apples serves several purposes beyond improving flavor. It removes excess moisture that could make the cake soggy, concentrates the apple flavor through caramelization, and ensures the apples are perfectly tender in the finished dessert. Raw apples often remain crunchy and can release too much liquid during baking.
Can I use store-bought pudding instead of making it from scratch? While homemade pudding provides the best flavor and texture, you can substitute with high-quality store-bought vanilla pudding in a pinch. Use about 200g of prepared pudding and ensure it’s thick enough to hold its shape when dolloped onto the cake. Avoid pudding that’s too thin, as it will sink into the batter completely.
What’s the best way to store leftovers? Store covered at room temperature for up to 3 days or refrigerated for up to 5 days. The cake can also be frozen for up to 3 months, though the texture of the pudding may change slightly upon thawing. When serving refrigerated cake, allow it to come to room temperature for 30 minutes for the best texture and flavor.
How can I tell when the cake is properly baked? The top should be golden brown and spring back lightly when touched. A toothpick inserted into the cake portion should come out with just a few moist crumbs. The pudding areas will remain softer than the cake, so avoid testing in those spots. If the top browns too quickly, tent with foil for the last 10-15 minutes of baking.
This melt-in-your-mouth apple pie with cream represents the perfect marriage of comfort and elegance. The combination of tender cake, perfectly spiced apples, and silky pudding creates a dessert that’s both familiar and sophisticated, making it ideal for family dinners or special occasions.