Discover why this Homemade Bread is a game-changer that could easily rival your favorite pizza. With its soft, airy interior, crispy golden crust, and a savory topping of garlic, fresh herbs, and melted cheese, this bread offers a burst of flavors and textures in every bite. Perfect as an appetizer, a side dish, or even the star of the meal, this bread is bound to become a family favorite.
Ingredients
For the Dough:
- 450 g (15.9 oz) Flour
- 1/2 Cube Fresh Yeast (20 g or 0.7 oz)
- 2 tablespoons Flour
- 1/2 teaspoon Sugar
- 1 teaspoon Salt
- 250 ml (8.8 fl oz) Lukewarm Water
For the Coating:
- 100 ml (3.4 fl oz) Olive Oil
- 2 Cloves Garlic – Grated or minced
- 1 Handful Fresh Basil – Chopped
- 1 Handful Fresh Parsley – Chopped
Additional Toppings:
- Grated Mozzarella or Parmesan – To taste
- A Few Olives – Sliced
Nutrition Information
- Servings: 6-8
- Calories: Approximately 300 kcal per serving
- Protein: 8 g
- Carbohydrates: 38 g
- Fat: 13 g
- Fiber: 2 g
Step-by-Step Instructions
1. Activating the Yeast
Begin by activating the yeast, a crucial step for achieving a light and airy bread. In a small bowl, crumble half a cube of fresh yeast and mix it with 1/2 teaspoon of sugar. The sugar helps to kickstart the yeast’s fermentation process.
Pour in 250 ml of lukewarm water, ensuring it’s not too hot, as this could kill the yeast. Add 2 tablespoons of flour to the mixture and stir until it is smooth and lump-free. Let the yeast mixture sit in a warm, draft-free place for about 10 minutes, or until it becomes foamy and activated. This foam indicates that the yeast is alive and ready to work its magic in your dough.
2. Creating the Dough
In a large mixing bowl, measure and sift 450 g of flour. Add 1 teaspoon of salt to the flour, which helps to enhance the flavor of the bread. Create a well in the center of the flour and pour in the activated yeast mixture.
If you’re using a dough mixer, knead the mixture on a low speed until it comes together as a compact dough and begins to pull away from the sides of the bowl. If kneading by hand, start by mixing the ingredients together until the flour is fully absorbed. Then, turn the dough out onto a lightly floured surface and knead for about 10 minutes until it becomes smooth, elastic, and only slightly sticky.
Shape the dough into a ball, place it back in the mixing bowl, and cover with a clean kitchen towel. Allow the dough to ferment in a warm, draft-free spot for about 30 minutes, or until it has doubled in size.
3. Rolling and Preparing
Once the dough has risen, gently punch it down to release any trapped air bubbles. Transfer the dough to a floured surface and roll it out evenly. Aim for a thickness of about 1.5 cm (1/2 inch).
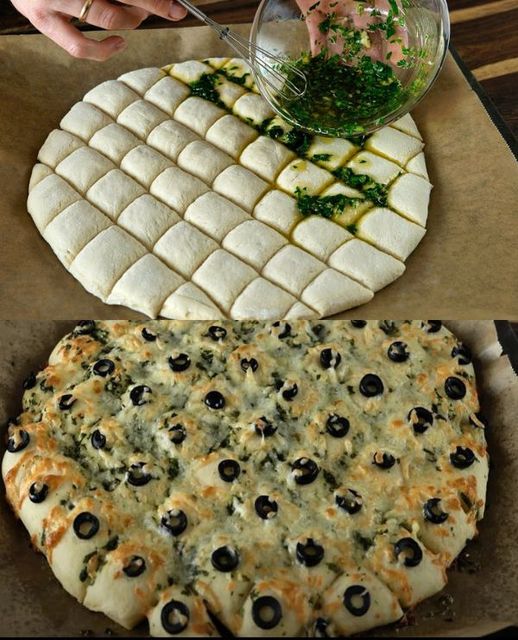
Place the rolled-out dough on a piece of baking paper and transfer it to a wide, shallow baking tray. Using a sharp knife or a pizza cutter, score the dough into cubes, making deep cuts without slicing all the way through. These cuts will allow the flavors to penetrate deep into the bread and also make it easy to pull apart once baked.
4. Crafting the “Pesto”
In a small bowl, prepare the garlic herb mixture that will coat the bread. Combine 100 ml of olive oil with the minced garlic, chopped basil, and parsley. Mix well to create a fragrant, flavorful paste.
Using a silicone brush, generously spread the garlic herb mixture over the surface of the dough, ensuring it seeps into the incisions. This coating will not only flavor the bread but also help it achieve a beautiful, golden crust.
5. Toppings and Baking
Now it’s time to add the final touches. Sprinkle grated mozzarella or parmesan along the cuts, allowing the cheese to melt into the bread as it bakes. Place a sliced olive on top of each cube and press down gently. For an extra cheesy experience, you can sprinkle a little more mozzarella over the entire surface.
Preheat your oven to 180°C (350°F). Once the oven is hot, bake the bread for 20 minutes or until it’s golden brown and the cheese is bubbling. The bread should sound hollow when tapped on the bottom, indicating it’s fully baked.
6. Cool and Serve
Remove the bread from the oven and allow it to cool slightly on a wire rack. This cooling period helps the bread set, making it easier to pull apart into individual cubes.
Serving Suggestions
This Homemade Garlic Herb Bread is best enjoyed warm, straight from the oven. It pairs beautifully with a variety of dishes, from hearty soups and stews to light salads and grilled meats. Serve it as an appetizer with a dipping sauce like marinara or a balsamic reduction, or enjoy it as a savory snack all on its own.
Why This Bread is Tastier Than Pizza
- Flavor Depth: The combination of fresh herbs, garlic, and olive oil infuses the bread with a rich, aromatic flavor that rivals even the best pizza toppings.
- Cheesy Goodness: The melted mozzarella or parmesan adds a satisfying savory note, creating a cheesy pull-apart effect that’s both fun and delicious.
- Versatility: This bread can be customized with additional toppings like sun-dried tomatoes, roasted peppers, or even crumbled feta, making it adaptable to your personal taste.
This homemade bread is a fantastic alternative to pizza when you’re craving something savory, cheesy, and utterly satisfying. Its perfect balance of softness and crispiness, combined with the bold flavors of garlic and herbs, will make it a go-to recipe in your kitchen.