Introduction
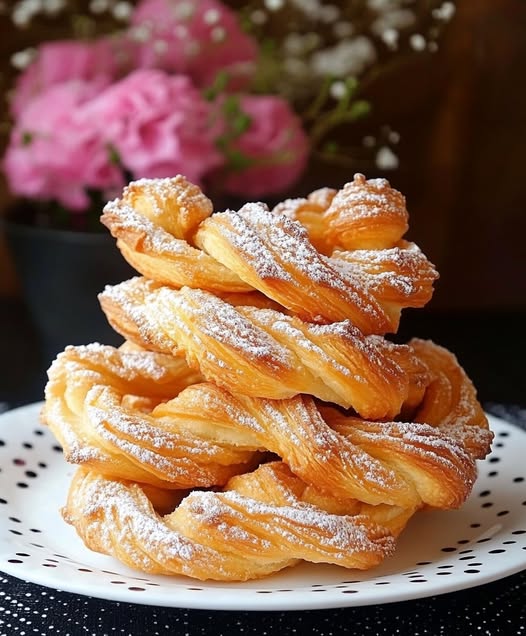
Elevate your dessert game with these stunning French Churros, also known as Choux Pastry Twists or Paris-Brest Twists. Unlike traditional Spanish or Mexican churros, these delicate French pastries showcase the magic of pâte à choux—the same versatile dough used to create éclairs, cream puffs, and profiteroles. These golden, twisted rings feature a crisp exterior that gives way to a light, airy interior with perfect hollow pockets. Delicately dusted with powdered sugar, these impressive-looking pastries are surprisingly approachable to make at home with just a handful of ingredients. Whether served as an elegant finish to a dinner party, a special weekend breakfast, or an afternoon treat with coffee, these twists will transport your taste buds straight to a Parisian patisserie. Perfect on their own or filled with pastry cream, they’re sure to become a new favorite in your baking repertoire.
Ingredients
For the Choux Pastry:
- 120ml (1/2 cup) water
- 120ml (1/2 cup) whole milk
- 115g (1/2 cup) unsalted butter
- 1/4 teaspoon salt
- 5g (1 teaspoon) granulated sugar
- 150g (1 1/4 cups) all-purpose flour, sifted
- 4 large eggs, at room temperature
For Frying:
- 1-2 liters (4-8 cups) vegetable oil for deep frying
For Finishing:
- 30g (1/4 cup) powdered sugar for dusting
Instructions
- Prepare the dough base: In a medium saucepan, combine water, milk, butter, salt, and sugar. Bring to a gentle boil over medium heat, stirring occasionally to help the butter melt completely.
- Add flour: Once the mixture is boiling and butter is fully melted, remove from heat and add all the flour at once. Stir vigorously with a wooden spoon until the mixture forms a smooth ball and pulls away from the sides of the pan.
- Cook the dough: Return the pan to medium-low heat and continue to stir for about 1-2 minutes. This important step dries out the dough slightly. You’ll know it’s ready when a thin film forms on the bottom of the pan and the dough comes together in a smooth mass.
- Cool the dough: Transfer the dough to the bowl of a stand mixer fitted with the paddle attachment (or a large mixing bowl if using a hand mixer). Let it cool for 5 minutes, stirring occasionally to release steam.
- Add eggs: With the mixer on medium speed, add eggs one at a time, ensuring each egg is fully incorporated before adding the next. The dough may look separated at first, but will come back together with continued mixing. The final dough should be smooth, glossy, and form a V-shaped ribbon when the paddle is lifted.
- Prepare for piping: Transfer the dough to a piping bag fitted with a large star tip (1/2-inch or 1.25cm opening). Let the dough rest for 10 minutes to firm up slightly for easier piping.
- Shape the churros: Line a baking sheet with parchment paper. Pipe 3-4 inch (8-10cm) long strips, then connect the ends to form rings. For a traditional twisted appearance, pipe with a slight twisting motion. Leave space between each churro as they will expand when fried.
- Prepare for frying: Heat oil in a heavy-bottomed pot or deep fryer to 350°F (175°C). The oil should be at least 2 inches (5cm) deep. Line a plate with paper towels for draining.
- Fry the churros: Carefully lower 2-3 churros into the hot oil, depending on the size of your pot (avoid overcrowding). Fry for 3-4 minutes, turning occasionally, until they’re golden brown and have puffed up significantly.
- Drain and cool: Remove with a slotted spoon and place on the paper towel-lined plate to drain excess oil. Allow to cool slightly.
- Finish and serve: Dust generously with powdered sugar just before serving. For best results, enjoy while still warm.
Nutritional Information and Timing
Prep Time: 20 minutes Rest Time: 10 minutes Cook Time: 20-25 minutes (for all batches) Total Time: 50-55 minutes
Yield: 12-14 churros
Per Churro (approximate):
- Calories: 170
- Fat: 11g
- Saturated Fat: 5g
- Carbohydrates: 14g
- Protein: 3g
- Fiber: 0.5g
- Sugar: 3g
- Sodium: 65mg
Cooking Tips and Tricks
- Temperature matters: Room temperature eggs are crucial for proper incorporation into the dough. Cold eggs can cause the batter to separate.
- The perfect choux consistency: Your dough should be thick enough to hold its shape when piped, but soft enough to pipe smoothly. If it’s too stiff, beat in a small amount of beaten egg, a teaspoon at a time.
- Oil temperature control: Use a candy/deep-fry thermometer to maintain a consistent oil temperature. If the oil is too hot, the churros will brown too quickly without cooking inside; too cool, and they’ll absorb oil and become greasy.
- Piping technique: Hold the piping bag at a 45-degree angle for more control. If the dough is difficult to pipe, let it cool a bit more or transfer to a sturdier piping bag.
- Crispier churros: For extra crispy churros, double-fry them. After the initial frying, let them cool completely, then fry again at 375°F (190°C) for 1 minute.
- Uniform size: For evenly cooked churros, try to make them all approximately the same size. A template drawn on parchment paper can help guide your piping.
- Preventing oil splatter: When adding churros to hot oil, lower them in gently rather than dropping them to prevent dangerous oil splashes.
- Perfect powdered sugar coating: Wait until the churros have cooled slightly but are still warm before dusting with powdered sugar. This helps the sugar adhere better without immediately melting.
Variations and Substitutions
- Cinnamon sugar coating: Instead of powdered sugar, roll warm churros in a mixture of 1/2 cup granulated sugar and 1 tablespoon ground cinnamon for a more traditional churro finish.
- Chocolate-dipped: Prepare a simple chocolate dip by melting 200g (7oz) dark chocolate with 120ml (1/2 cup) heavy cream for a decadent treat.
- Filled version: Allow churros to cool completely, then use a small piping tip to fill with pastry cream, chocolate ganache, or dulce de leche.
- Flavor infusions: Add citrus zest (lemon, orange) to the dough or replace vanilla extract with almond, maple, or hazelnut extract.
- Gluten-free adaptation: Substitute all-purpose flour with a 1:1 gluten-free flour blend that contains xanthan gum. The texture will be slightly different but still delicious.
- Baked option: For a lighter version, pipe churros onto a parchment-lined baking sheet, brush with beaten egg, and bake at 400°F (200°C) for about 20-25 minutes until golden and puffed.
- Savory twist: Omit the sugar in the dough and add 1/4 cup of grated parmesan and a pinch of cayenne pepper for savory cheese twists.
- Mini churro bites: Pipe small 1-inch rounds for bite-sized treats that cook more quickly and are perfect for parties.
Common FAQs
Q: Why did my churros deflate after frying?
A: This usually happens when the churros aren’t cooked long enough or the oil temperature is too low. Make sure your oil stays at 350°F (175°C) and fry until deep golden brown. Another cause could be undercooking the flour mixture before adding eggs.
Q: Can I make the dough ahead of time?
A: Yes, choux pastry can be made up to 24 hours in advance and stored in a piping bag in the refrigerator. Let it come to room temperature for about 30 minutes before piping. However, for best results, fry shortly after piping.
Q: My dough is too runny. What happened?
A: You may have added too many eggs or not cooked the initial flour mixture long enough to dry it out. Add a tablespoon or two of flour and mix well to thicken it. Next time, cook the flour mixture a bit longer before adding eggs.
Q: Why are my churros raw in the middle?
A: Either your oil was too hot, causing the outside to brown before the inside cooked, or the piped churros were too thick. Maintain proper oil temperature and ensure uniform thickness when piping.
Q: Can these be made without a piping bag or star tip?
A: While a star tip creates the classic ridged texture that helps churros cook evenly and hold more coating, you can use a round tip in a pinch. In an emergency, you could use a plastic bag with the corner snipped off, though the churros won’t have ridges and may not be as crisp.
Storage and Make-Ahead Tips
Room Temperature:
- These churros are best enjoyed fresh and warm, within a few hours of frying.
- They can be kept at room temperature for up to 24 hours, though they will lose some crispness.
Refrigerator:
- Refrigeration is not recommended for cooked churros as it makes them soggy.
- However, the uncooked dough can be refrigerated in a piping bag for up to 24 hours before frying.
Freezer:
- Piped, uncooked churros can be frozen on a baking sheet, then transferred to a freezer bag for up to 1 month.
- Fry directly from frozen, adding about 1-2 extra minutes to the frying time.
- Cooked churros don’t freeze well as they become soggy when thawed.
Reheating:
- To refresh day-old churros, reheat in a 350°F (175°C) oven for 5-7 minutes until crisp and warm.
- Avoid microwaving as this will make them soggy.
Make-Ahead Components:
- Choux dough: Can be made up to 24 hours ahead and stored in the refrigerator in a sealed piping bag. Bring to room temperature before piping.
- Piped shapes: Can be piped onto parchment-lined baking sheets, frozen until solid, then transferred to airtight containers and stored in the freezer for up to 1 month.
- Sugar coatings: Can be prepared several days in advance and stored in airtight containers.
Serving Suggestions:
- For the freshest experience, consider making the dough ahead of time but frying just before serving.
- Serve with dipping sauces such as chocolate ganache, caramel sauce, or fruity coulis for an interactive dessert experience.
- For brunch, pair with fresh fruit and strong coffee for a delightful morning treat.
These French Churros are a delightful twist on the classic Spanish version, offering the perfect combination of crisp exterior and light, airy interior. While they require a bit of technique, the impressive results are well worth the effort. Whether enjoyed as a special breakfast, afternoon treat, or elegant dessert, these pastries are sure to impress with their professional appearance and delectable taste. With practice, you’ll master the art of choux pastry and be able to create these beautiful twisted pastries with confidence!