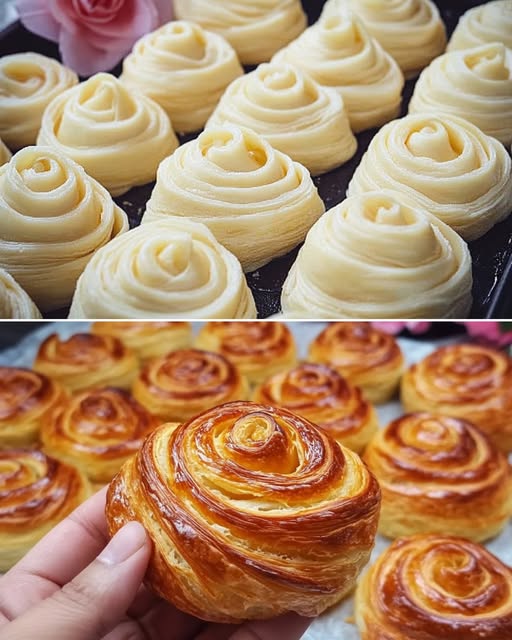
There’s something magical about biting into a perfectly baked pastry with dozens of buttery, flaky layers that shatter delicately with each bite. These spiral puff buns deliver all the satisfaction of a croissant with a simpler technique that anyone can master. The secret lies in the unique rolling and folding method that creates beautiful, distinct layers without the fuss of traditional laminated dough. Perfect for breakfast, brunch, or alongside your favorite soup or stew, these golden, swirled beauties will impress everyone at your table.
Ingredients
For the dough:
- 500ml (2 cups) water
- 7g (2¼ teaspoons) dry yeast
- 2 tablespoons sugar
- 600g (5½-6 cups) all-purpose flour
- 1 teaspoon salt
- 70g (5 tablespoons) butter, for the dough
For laminating:
- 200g (14 tablespoons) butter, at room temperature
For the egg wash:
- 1 egg yolk
- 1 tablespoon milk
Instructions
- Prepare the dough base: In a large bowl, combine water, dry yeast, and sugar. Let sit for 5-10 minutes until foamy.
- Form the dough: Add flour and salt to the yeast mixture and stir until a shaggy dough forms. Add 70g of butter to the dough.
- Knead thoroughly: Knead the dough for 8-10 minutes until smooth and elastic. This may take time, so feel free to use a stand mixer with a dough hook if available.
- Divide the dough: Once the dough is smooth, divide it into 12 equal portions. Shape each portion into a ball.
- First rest: Cover the dough balls and let them rest for 20 minutes at room temperature.
- First rolling: On a clean work surface (without adding flour), roll each ball into a long oval shape.
- Add butter: Spread room temperature butter evenly over the surface of each rolled-out piece of dough.
- First roll-up: Starting from one end, tightly roll up each buttered dough piece into a cylinder.
- Stretch technique: Gently stretch each cylinder by holding one end and tapping it against the counter a few times to elongate.
- Initial chill: Place all the rolled cylinders on a tray, cover, and freeze for 15 minutes (not longer).
- Second rolling: Remove from freezer and roll each cylinder lengthwise again into a longer, flatter strip.
- Final shaping: Roll up each strip tightly into a cylinder again. Using a sharp knife, cut each cylinder in half crosswise to expose the spiral pattern.
- Arrange for rising: Place the cut pieces, spiral side up, on a parchment-lined baking tray, leaving space between each bun for expansion.
- Final rise: Place the tray in a preheated 40°C (104°F) oven with the door slightly ajar, or in another warm place, and let the buns rise for 1 hour until noticeably puffed.
- Prepare for baking: Preheat your oven to 180°C (350°F). Mix the egg yolk and milk to create an egg wash.
- Apply egg wash: Gently brush the tops of the risen buns with egg wash, being careful not to deflate them.
- Bake to perfection: Bake for 20-25 minutes, or until the buns are golden brown and flaky.
- Cool slightly: Allow the buns to cool for 5-10 minutes before serving warm.
Nutritional Information & Timing
Prep Time: 1 hour
Rise Time: 1 hour 20 minutes
Bake Time: 20-25 minutes
Total Time: Approximately 3 hours
Yield: 24 buns
Per Bun (approximate):
- Calories: 210
- Fat: 12g
- Carbohydrates: 22g
- Protein: 3g
- Fiber: 1g
- Sodium: 120mg
Cooking Tips and Tricks
- Butter temperature matters: The butter for laminating should be soft enough to spread easily but not melted. If it’s too cold, it won’t spread; if it’s too warm, it will absorb into the dough rather than creating distinct layers.
- Cold dough, warm butter: For the best layers, chill the dough briefly but use room temperature butter for spreading. This creates the perfect temperature contrast for lamination.
- The tapping technique: When you tap the rolled cylinder against the counter, hold it from one end and let gravity do the work. This gently stretches the dough without tearing it.
- Sharp knife secret: For the cleanest cut that reveals the beautiful spirals, freeze the rolled dough for exactly 15 minutes, then use your sharpest knife. A slight sawing motion helps prevent compression.
- Proper proofing: These buns need proper rising time to develop their flaky texture. They should nearly double in size before baking. If your kitchen is cold, create a warm environment by placing them near a warm oven or using the low-temperature oven method described.
Variations and Substitutions
Sweet Variations
- Cinnamon Sugar: Spread a thin layer of softened butter mixed with cinnamon and brown sugar before the final roll-up.
- Chocolate: Sprinkle thin chocolate shavings over the butter layer before rolling.
- Orange Cardamom: Add orange zest and ground cardamom to the butter for a fragrant twist.
Savory Options
- Cheese: Sprinkle grated Gruyère or Parmesan cheese over the butter layer.
- Herb: Mix finely chopped fresh herbs like rosemary, thyme, or chives into the softened butter.
- Garlic: Spread the dough with garlic butter for extra flavor.
Ingredient Substitutions
- Butter alternatives: While butter provides the best flavor, you can substitute a high-quality margarine or plant-based butter for a dairy-free version.
- Flour options: Try substituting up to 25% of the all-purpose flour with whole wheat flour for a nuttier flavor.
- Sugar replacements: The sugar can be reduced or replaced with honey if preferred.
Common FAQs
Q: Can I make these buns ahead of time? A: Yes! You can prepare the dough through step 12, then refrigerate overnight. Allow the shaped buns to come to room temperature and complete the final rise before baking.
Q: Why did my layers disappear during baking? A: This usually happens if the butter melts into the dough before baking. Make sure to chill the dough properly and don’t let the shaped buns sit too long in a warm environment before baking.
Q: Can I freeze these buns? A: Absolutely. Freeze them after shaping (before the final rise) or after baking (once completely cooled). To bake from frozen, thaw overnight in the refrigerator, then allow to rise at room temperature before baking.
Q: My dough is too sticky to work with. What should I do? A: If the dough is too sticky during initial kneading, add flour 1 tablespoon at a time until manageable. During the rolling and shaping process, a brief chilling in the freezer can make overly soft dough easier to handle.
Q: How do I know when they’re properly baked? A: The buns should be deeply golden on top and sound hollow when tapped on the bottom. If they’re browning too quickly but still seem doughy inside, cover loosely with foil for the remaining bake time.
Storage and Make-Ahead Tips
- Same-day storage: Once completely cooled, store in an airtight container at room temperature for up to 2 days.
- Refrigeration: These buns can be refrigerated for up to 5 days in an airtight container. Reheat in a 350°F (180°C) oven for 5 minutes before serving.
- Freezing baked buns: Wrap individual buns tightly in plastic wrap, then place in a freezer bag. Freeze for up to 3 months. Thaw at room temperature and reheat in a 350°F (180°C) oven for 7-10 minutes.
- Make-ahead option: Prepare the recipe through the shaping stage, then cover the buns tightly and refrigerate overnight. Allow them to come to room temperature and complete their final rise before baking.
- Refreshing day-old buns: To revive slightly stale buns, sprinkle with a few drops of water and heat in a 350°F (180°C) oven for 3-5 minutes.
These flaky spiral puff buns combine the best aspects of dinner rolls and croissants with a technique that’s much more approachable than traditional laminated pastry. The result is a bakery-quality treat that will have everyone asking for your secret. Whether served alongside breakfast, used to make mini sandwiches, or simply enjoyed with a smear of butter and jam, these buns will quickly become a favorite in your baking repertoire.