
Decadent No-Bake Eggless Chocolate Brownie Dessert
Introduction
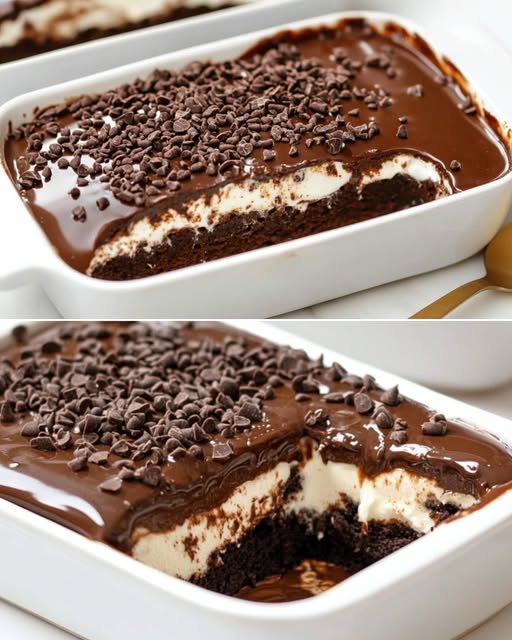
Indulge in the ultimate chocolate lover’s dream with this sumptuous eggless chocolate brownie dessert that requires no oven! This triple-layer treat features a moist, rich chocolate brownie base topped with a cloud of whipped cream and finished with a glossy chocolate ganache. Perfect for special occasions or whenever chocolate cravings strike, this dessert offers the perfect balance of textures and intensities. The absence of eggs makes it suitable for vegetarians, while the no-bake preparation method ensures success even without conventional baking equipment. Whether you’re an experienced baker or a novice in the kitchen, this foolproof recipe delivers restaurant-quality results with minimal effort.
Ingredients
For the Brownie Base:
- 100g (3.5oz) semi-sweet dark chocolate, chopped
- 100g (3.5oz or 7 tablespoons) unsalted butter
- 80g (1/3 cup) granulated sugar
- 190g (1+1/2 cups) all-purpose flour (maida)
- 15g (2 tablespoons) cocoa powder
- 5g (1 teaspoon) baking powder
- 120ml (1/2 cup) warm milk
- 2.5ml (1/2 teaspoon) vanilla extract
For the Whipped Cream Layer:
- 200ml (approximately 3/4 cup + 1 tablespoon) whipping cream (heavy cream)
- 30g (1/4 cup) powdered sugar
For the Chocolate Ganache:
- 100g (3.5oz) semi-sweet dark chocolate, chopped
- 80ml (1/3 cup) hot milk
Optional Topping:
- Chocolate sprinkles or chocolate shavings
Instructions
Step 1: Prepare the Pan
- Line a 10×5 inch baking tray or dish with parchment paper, leaving some overhang on the sides for easy removal later.
Step 2: Make the Brownie Base
- In a medium microwave-safe bowl, combine the chopped dark chocolate and butter. Microwave in 30-second intervals, stirring between each interval, until completely melted and smooth.
- Add sugar to the chocolate mixture and stir until well combined. Allow to cool slightly.
- In a separate bowl, sift together the flour, cocoa powder, and baking powder.
- Gradually add the dry ingredients to the chocolate mixture, alternating with warm milk. Mix until just combined.
- Stir in the vanilla extract.
- Pour the batter into the prepared pan, spreading it evenly.
- Cover with aluminum foil and steam for 25-30 minutes. To steam: place the pan in a larger pan filled with about 1 inch of hot water, then cover and cook on medium heat. Alternatively, use a steamer or pressure cooker without the whistle.
- Check for doneness by inserting a toothpick into the center – it should come out with a few moist crumbs.
- Allow the brownie to cool completely in the pan.
Step 3: Prepare the Whipped Cream Layer
- In a chilled bowl, beat the whipping cream until it begins to thicken.
- Gradually add the powdered sugar while continuing to beat until stiff peaks form.
- Spread the whipped cream evenly over the cooled brownie layer.
- Refrigerate for at least 30 minutes to set.
Step 4: Make the Chocolate Ganache
- Place the chopped chocolate in a heat-resistant bowl.
- Pour the hot milk over the chocolate and let it sit for 1-2 minutes.
- Stir gently until the chocolate is completely melted and the mixture is smooth and glossy.
- Allow the ganache to cool slightly but remain pourable.
Step 5: Assemble the Dessert
- Pour the chocolate ganache over the chilled whipped cream layer, ensuring it spreads evenly to the edges.
- Gently tap the dish to smooth the ganache.
- Sprinkle with chocolate shavings or sprinkles, if desired.
- Refrigerate for at least 4 hours, or preferably overnight, before serving.
Nutritional Information and Timing
Preparation Time: 30 minutes
Cooking Time: 30 minutes (steaming)
Chilling Time: Minimum 4-5 hours
Total Time: 5-6 hours (including chilling)
Servings: 8-10 portions
Per Serving (approximate values):
- Calories: 350-400 kcal
- Fat: 22g
- Carbohydrates: 38g
- Protein: 5g
- Fiber: 2g
- Sugar: 20g
- Sodium: 75mg
Cooking Tips and Tricks
- Chocolate selection: Use good quality chocolate with 50-60% cocoa content for the best flavor and texture. Higher cocoa percentages will result in a less sweet, more intense chocolate flavor.
- Steam cooking perfection: When steaming the brownie, ensure the water doesn’t touch the bottom of your brownie pan. The steam should cook it gently to achieve the perfect fudgy texture.
- Even layers: For professional-looking results, use an offset spatula to spread both the whipped cream and ganache layers evenly.
- Whipping cream success: Chill your mixing bowl and beaters in the freezer for 15 minutes before whipping the cream. This helps it whip faster and hold its shape better.
- Ganache consistency: The ideal ganache for topping should be pourable but not too runny. If it’s too thick, add a tablespoon of hot milk; if too thin, allow it to cool longer or add more chopped chocolate.
- Clean cuts: For picture-perfect slices, dip your knife in hot water and wipe dry between each cut.
- Temperature matters: Remove the dessert from the refrigerator about 10-15 minutes before serving to allow the ganache to soften slightly, making it easier to cut and enhancing the flavor.
Variations and Substitutions
- Coffee-infused: Add 1 teaspoon of instant coffee powder to the warm milk for a mocha flavor profile.
- Nutty delight: Sprinkle a layer of chopped toasted nuts (walnuts, hazelnuts, or almonds) between the brownie and whipped cream layers.
- Gluten-free option: Replace all-purpose flour with a gluten-free flour blend in equal amounts; add 1/4 teaspoon xanthan gum if your blend doesn’t already include it.
- Vegan adaptation: Use plant-based butter, plant-based whipping cream, and ensure your chocolate doesn’t contain milk solids.
- Mint chocolate: Add 1/4 teaspoon of peppermint extract to the whipped cream layer for a refreshing twist.
- Berry addition: Layer fresh raspberries or strawberries between the brownie and whipped cream for a fruity contrast.
- Caramel lover’s variation: Drizzle caramel sauce between layers and on top of the ganache.
- Spiced chocolate: Add 1/2 teaspoon of cinnamon and a pinch of cayenne pepper to the brownie mixture for a Mexican chocolate inspired dessert.
Common FAQs
Q: Can I make this dessert ahead of time?
A: Absolutely! This dessert actually improves with time as the flavors meld together. You can prepare it up to 2 days in advance and keep refrigerated until serving.
Q: Why is my brownie layer too dry?
A: Over-steaming or using too little butter can result in a dry brownie. Ensure you’re steaming for the recommended time and measuring ingredients accurately.
Q: My whipped cream isn’t holding its shape. What went wrong?
A: Cream whips best when cold. Ensure both your cream and equipment are well-chilled before whipping. Also, make sure you’re using heavy whipping cream with at least 35% fat content.
Q: Can I freeze this dessert?
A: Yes, but for best results, freeze before adding the ganache layer. Thaw overnight in the refrigerator, then add the ganache before serving.
Q: How do I know when the brownie is cooked properly without an oven?
A: Insert a toothpick into the center – it should come out with a few moist crumbs, not wet batter. The brownie should also feel set when gently pressed in the center.
Storage and Make-Ahead Tips
- Refrigerator storage: This dessert will keep well in the refrigerator for up to 5 days when stored in an airtight container or covered tightly with plastic wrap.
- Freezing instructions: To freeze, cut into individual portions and place on a baking sheet until solid. Then wrap each piece in plastic wrap, followed by aluminum foil. Freeze for up to 2 months. Thaw overnight in the refrigerator.
- Component preparation: Each layer can be prepared separately in advance. The brownie layer can be made 1-2 days ahead and kept at room temperature (well-wrapped). The ganache can be made up to 3 days ahead and gently reheated before using.
- Transport tips: If transporting this dessert, keep it in the original baking dish and refrigerate until the last possible moment. Transport in a cooler with ice packs to maintain its structure.
- Serving suggestions: For an elegant presentation, serve with fresh berries, a dusting of cocoa powder, or a small scoop of vanilla ice cream on the side.
- Leftover transformation: Transform leftovers into a trifle by cutting into cubes and layering with additional whipped cream and fresh fruit.
This no-bake eggless chocolate brownie dessert offers a perfect solution for chocolate cravings without the need for conventional baking. The combination of the fudgy brownie base, creamy middle layer, and rich chocolate topping creates a symphony of textures and flavors that’s sure to impress. Whether served at a dinner party, special celebration, or simply as a weekend treat, this dessert delivers gourmet results with remarkable ease. The make-ahead nature of this recipe also makes it perfect for busy hosts who want to prepare something spectacular with minimal day-of stress.