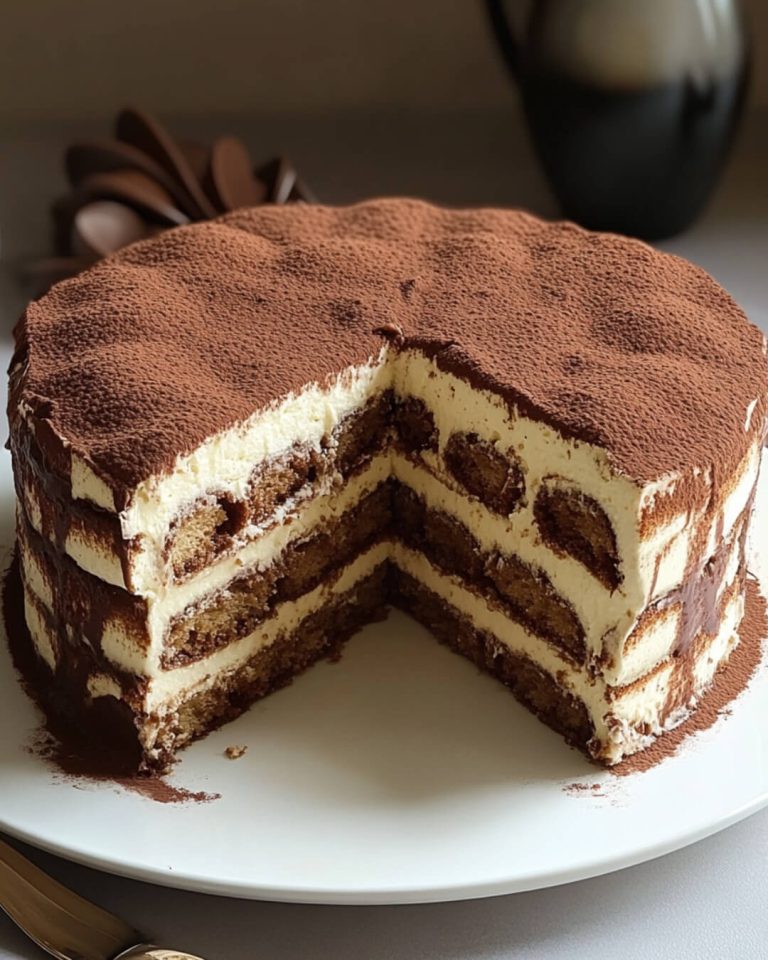
Indulge in the decadent delight of this Chocolate Tiramisu Cake with Cream Cheese Filling. This rich, moist chocolate cake, layered with a smooth and creamy filling, is perfect for any special occasion or when you simply want to treat yourself to a luxurious dessert. The combination of light, fluffy cake and creamy filling, accented by a hint of coffee, makes each bite a heavenly experience. This recipe will guide you through creating a beautiful and delicious cake that’s sure to impress.
Ingredients
For the Cake:
- 4 egg yolks, room temperature
- 20g sugar (1½ tablespoons)
- 1/2 teaspoon vanilla extract
- 40g milk, room temperature (3 tablespoons)
- 40g vegetable oil (3 tablespoons)
- 30g all-purpose flour (¼ cup)
- 20g cocoa powder (2 tablespoons)
- 4 egg whites, room temperature
- A pinch of salt
- 1/8 teaspoon cream of tartar
- 60g sugar (¼ cup + 1 tablespoon)
For the Cream Cheese Filling:
- 250g unsalted cream cheese or mascarpone (1 cup)
- 4-5 tablespoons powdered sugar (to taste)
- 1/2 teaspoon vanilla extract
- 1 tablespoon cocoa powder
- 250g heavy cream (33%) (1 cup)
For Assembly:
- 180ml boiling water (¾ cup)
- 3 tablespoons instant coffee powder
- Ladyfingers (as needed)
- Cocoa powder (for dusting)
Instructions
Step 1: Prepare the Cake
- Preheat Oven: Preheat your oven to 170°C (340°F). Line a 25×35 cm (10×14 inches) baking sheet with parchment paper to prevent sticking and ensure even baking.
- Mix Egg Yolks: In a medium bowl, whisk together the egg yolks, 20g of sugar, and vanilla extract until the mixture is light and creamy. This step ensures a smooth and airy batter base.
- Add Milk and Oil: Incorporate the milk and vegetable oil into the egg yolk mixture, stirring well to combine.
- Sift Dry Ingredients: Sift the flour and cocoa powder into the wet mixture, gently folding them in until the batter is smooth and fully incorporated.
- Beat Egg Whites: In a separate, clean bowl, beat the egg whites with a pinch of salt and cream of tartar until foamy. Gradually add the 60g of sugar while continuing to beat until stiff peaks form. This step is crucial for achieving a light and fluffy cake texture.
- Combine Mixtures: Carefully fold the beaten egg whites into the chocolate batter in batches, being gentle to avoid deflating the mixture. This will keep the cake airy and light.
- Bake: Pour the batter into the prepared baking sheet, spreading it evenly. Bake in the preheated oven for about 30 minutes, or until a toothpick inserted into the center comes out clean. Once baked, remove the cake from the oven and let it cool completely before slicing it into layers.
Step 2: Prepare the Cream Cheese Filling
- Cream the Cheese: In a large bowl, beat the cream cheese or mascarpone with the powdered sugar and vanilla extract until smooth and creamy. Make sure there are no lumps for a perfect filling.
- Add Cocoa Powder: Mix in the cocoa powder until fully combined, creating a rich chocolate flavor in the filling.
- Whip the Cream: In a separate bowl, whip the heavy cream until stiff peaks form. Fold the whipped cream into the cream cheese mixture until well combined, ensuring a light and fluffy texture.
Step 3: Assemble the Cake
- Make Coffee Soak: Dissolve the instant coffee powder in 180ml of boiling water to create a coffee soak. This will add moisture and depth of flavor to the cake layers.
- Slice the Cake: Once the cake has cooled completely, slice it evenly into 4-5 layers. This can be done using a serrated knife or a cake leveler for precision.
- Layer the Cake: Place the first layer of cake on a serving plate or cake board. Generously brush it with the coffee soak to infuse moisture. Spread a layer of the cream cheese filling on top.
- Add Ladyfingers (Optional): If desired, add a layer of ladyfingers on top of the cream cheese filling, brushing them lightly with the coffee soak for additional flavor and texture.
- Continue Layering: Repeat the process with the remaining cake layers and cream filling. Ensure each layer is evenly coated with filling to maintain the cake’s structure and flavor balance.
- Finish with Cream Cheese Filling: Spread the remaining cream cheese filling on the top and sides of the cake, smoothing it out with a spatula for a clean finish.
Step 4: Decorate
- Dust with Cocoa Powder: Generously dust the top of the cake with cocoa powder for a rich and elegant finish. This adds a final touch of chocolate flavor and visual appeal.
Step 5: Serve
- Chill and Set: Chill the cake in the refrigerator for at least an hour before slicing and serving. This allows the flavors to meld together beautifully, enhancing the overall taste and texture.
- Serve: Slice and enjoy this indulgent chocolate layer cake with cream cheese filling, perfect for any occasion!
Tips for Perfect Chocolate Layer Cake
- Room Temperature Ingredients: Make sure your eggs, cream cheese, and milk are at room temperature for smoother mixing and better texture.
- Be Gentle with Egg Whites: When folding the egg whites into the batter, do so gently to avoid losing the air that makes the cake fluffy.
- Chill for Easier Slicing: Chilling the cake before slicing will help the layers hold together better and make the cake easier to cut.
- Customize Layers: Feel free to customize by adding chocolate chips, nuts, or fruit between the layers for added flavor and texture.
Nutrition Information (per serving, serves 12)
- Calories: 350
- Total Fat: 22g
- Saturated Fat: 12g
- Cholesterol: 115mg
- Sodium: 150mg
- Total Carbohydrates: 33g
- Dietary Fiber: 1g
- Sugars: 20g
- Protein: 6g
Enjoy the rich, velvety layers of this Chocolate Tiramisu Cake with Cream Cheese Filling—a dessert that’s as visually stunning as it is delicious. Perfect for celebrations or just a sweet indulgence, this cake is sure to impress your guests and satisfy your sweet cravings!