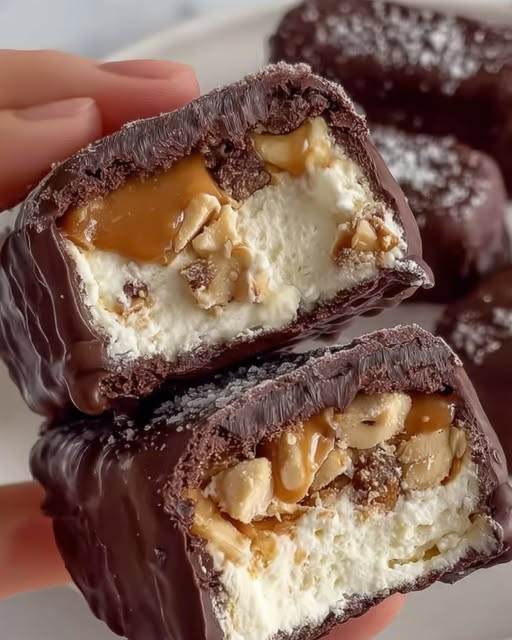
These homemade Snickers ice cream bars deliver all the satisfaction of the classic candy bar in a healthier, frozen format. Made with natural ingredients and no artificial additives, these creamy coconut-based bars feature layers of vanilla ice cream, peanut butter caramel, crunchy peanuts, and rich chocolate coating.
Ingredients
For the Ice Cream Base:
- 200ml (7 fl oz) full-fat canned coconut milk
- 60g (¼ cup) natural peanut butter
- 2 tablespoons honey or maple syrup
- 1 teaspoon vanilla extract
- ¼ teaspoon salt
For the Peanut Butter Caramel:
- 125g (½ cup) natural peanut butter
- 2 tablespoons honey or maple syrup
- ⅛ teaspoon salt
- 3 tablespoons full-fat coconut milk
- 50g (⅓ cup) roasted peanuts, roughly chopped
For the Chocolate Coating:
- 170-255g (6-9 oz) dark or semi-sweet chocolate, chopped
- 1-2 teaspoons coconut oil
Step-by-Step Instructions
Creating the Ice Cream Layer
Step 1: Line a 20cm x 12cm (8×5 inch) loaf pan with parchment paper, leaving overhang on the sides for easy removal. Ensure the parchment reaches all corners and edges.
Step 2: Add the coconut milk, peanut butter, honey or maple syrup, vanilla extract, and salt to a high-speed blender. Blend on high speed for 60-90 seconds until the mixture is completely smooth and creamy with no visible peanut butter streaks.
Step 3: Pour the ice cream mixture into the prepared loaf pan, spreading it evenly with a spatula. Gently tap the pan on the counter to release any air bubbles and create a smooth surface.
Step 4: Cover the pan tightly with plastic wrap or aluminum foil and place in the freezer for 4-6 hours, or until completely solid. The ice cream layer should be firm enough to support the caramel without mixing together.
Preparing the Peanut Butter Caramel Layer
Step 5: In a medium bowl, whisk together the peanut butter, honey or maple syrup, salt, and coconut milk until smooth and well combined. The mixture should have a thick but spreadable consistency similar to frosting.
Step 6: Remove the frozen ice cream from the freezer. Working quickly, spread the peanut butter caramel evenly over the ice cream layer using an offset spatula or the back of a spoon.
Step 7: Sprinkle the chopped peanuts generously over the caramel layer, then gently press them into the surface to ensure they adhere properly. This creates the signature Snickers crunch.
Step 8: Return the pan to the freezer for another 4-6 hours, or overnight, until both layers are completely frozen solid.
Cutting and Coating the Bars
Step 9: Remove the frozen bars from the pan using the parchment paper overhang. Place on a cutting board and use a sharp knife to cut into 8 equal bars, approximately 2.5cm (1 inch) wide. Clean the knife between cuts for neat edges.
Step 10: Place the cut bars on a parchment-lined baking sheet and return to the freezer while preparing the chocolate coating.
Preparing the Chocolate Coating
Step 11: Melt the chocolate and coconut oil together using a double boiler or microwave in 30-second intervals, stirring between each interval until smooth. The coconut oil helps create a thinner coating that hardens beautifully.
Step 12: Remove the bars from the freezer one at a time. Using two forks or dipping tools, dip each bar completely in the melted chocolate, allowing excess to drip off. Place the coated bars back on the parchment-lined baking sheet.
Step 13: Once all bars are coated, return them to the freezer for 30-45 minutes until the chocolate coating is completely set and hardened.
Nutritional Information and Timing
Preparation Time: 45 minutes Freezing Time: 8-12 hours total Total Time: 12-13 hours Servings: 8 bars
Nutritional Information (per bar):
- Calories: 285
- Fat: 22g
- Saturated Fat: 12g
- Carbohydrates: 18g
- Sugar: 14g
- Protein: 7g
- Fiber: 3g
- Sodium: 180mg
Recipe Variations and Substitutions
Dairy-Free and Vegan Options
This recipe is naturally dairy-free and vegan when using maple syrup instead of honey. For those with coconut allergies, substitute the coconut milk with cashew cream made from soaked cashews blended with water, though the texture will be slightly different.
Nut-Free Alternatives
Create nut-free versions by replacing peanut butter with sunflower seed butter or tahini. Use roasted sunflower seeds instead of peanuts for the crunch factor. The flavor profile will change but remains delicious.
Flavor Variations
Transform these bars with different flavor combinations. Try almond butter with sliced almonds for an almond joy version, or use cashew butter with dried fruit pieces for a tropical twist. Add a teaspoon of espresso powder to the chocolate coating for mocha-flavored bars.
Sugar Alternatives
Replace honey or maple syrup with stevia, monk fruit sweetener, or sugar-free maple syrup for a lower-carb version. Start with smaller amounts as these alternatives are often sweeter than traditional sweeteners.
Chocolate Options
Experiment with different chocolate types. White chocolate creates an elegant appearance, while milk chocolate offers a sweeter taste. For extra richness, use 70% dark chocolate, or try sugar-free chocolate chips for a healthier option.
Storage and Serving Tips
Store your homemade Snickers ice cream bars in an airtight container in the freezer for up to 3 months. Wrap individual bars in parchment paper to prevent them from sticking together and make grab-and-go snacking easier.
For optimal texture, remove bars from the freezer 3-5 minutes before serving to allow slight softening. This prevents the ice cream from being too hard and makes the bars easier to bite into. On hot days, reduce this time to 1-2 minutes to prevent melting.
These bars are perfect for meal prep, party desserts, or healthy treat alternatives. Consider making double batches since they freeze so well and disappear quickly once family and friends discover them.
Frequently Asked Questions
Can I use light coconut milk instead of full-fat? Full-fat coconut milk is essential for achieving the proper creamy texture and richness. Light coconut milk contains too much water and will result in icy, less satisfying ice cream bars. If you only have light coconut milk, refrigerate the can overnight and use only the thick cream that separates at the top.
How do I prevent the chocolate coating from cracking? Adding coconut oil to the melted chocolate helps create a more flexible coating that’s less likely to crack. Also, ensure your bars are very cold when dipping, and don’t let them sit at room temperature too long before returning to the freezer. Work quickly during the coating process.
Why is my caramel layer too runny or too thick? The consistency of natural peanut butter varies between brands, affecting the caramel texture. If too runny, add more peanut butter or refrigerate the mixture for 15 minutes before spreading. If too thick, add coconut milk one teaspoon at a time until spreadable.
Can I make these bars without a high-speed blender? While a high-speed blender creates the smoothest texture, you can use a food processor or even mix by hand. Ensure the coconut milk is at room temperature for easier blending, and mix thoroughly to eliminate any peanut butter lumps. The texture may be slightly less smooth but still delicious.
How long do these bars need to freeze before they’re ready? Each layer needs 4-6 hours to freeze completely, so plan for at least 8-12 hours total time. The bars are ready when the ice cream layer doesn’t dent when pressed and the caramel layer is solid. Overnight freezing often works best for busy schedules.