Introduction
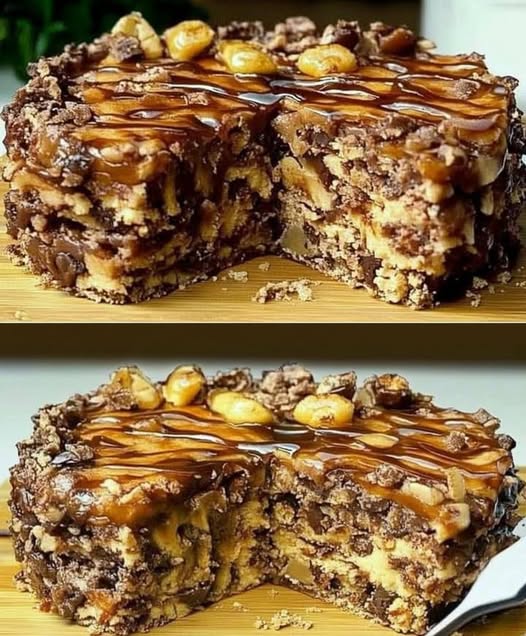
Indulge in the ultimate sweet treat with this show-stopping No-Bake Chocolate Caramel Biscuit Cake! This impressive dessert combines the rich flavors of chocolate and caramel with the satisfying crunch of biscuits and nuts for an irresistible texture contrast in every bite. The beauty of this cake lies not only in its decadent appearance and flavor but also in its simplicity—requiring zero baking and minimal preparation time. Perfect for when you need an impressive dessert but don’t want to turn on the oven, this refrigerator cake has layers of chocolate-coated biscuits, sweet caramel, and crunchy nuts that meld together into a sliceable confection that tastes like it took hours to make. Whether you’re hosting guests, bringing a dish to a potluck, or simply treating yourself to something special, this no-bake wonder will quickly become your go-to recipe for satisfaction without the hassle.
Ingredients
For the Biscuit Base:
- 400g (14oz) digestive biscuits or graham crackers
- 200g (7oz) unsalted butter
- 200g (1 cup) dark chocolate chips
- 100g (1/2 cup) milk chocolate chips
- 3 tablespoons cocoa powder
- 100g (1/2 cup) granulated sugar
- 60ml (1/4 cup) milk
For the Caramel Layer:
- 400g (14oz) store-bought caramel sauce or dulce de leche
- 1/2 teaspoon sea salt (optional, for salted caramel flavor)
For the Topping:
- 150g (1 cup) mixed nuts (walnuts, hazelnuts, peanuts)
- 100g (1/2 cup) caramel chips or butterscotch chips
- 4 tablespoons caramel sauce (for drizzling)
- 50g (1/4 cup) dark chocolate, melted (for drizzling)
Instructions
- Prepare the pan: Line an 8-inch (20cm) square cake pan or dish with parchment paper, leaving some overhang for easy removal later.
- Crush the biscuits: Place the digestive biscuits or graham crackers in a large zip-top bag and crush with a rolling pin until you have a mixture of fine crumbs and small chunks. Alternatively, pulse in a food processor, being careful not to make the crumbs too fine – some texture is desirable.
- Make the chocolate mixture: In a large saucepan over low heat, melt the butter, both chocolate chips, cocoa powder, sugar, and milk, stirring constantly until smooth and fully combined.
- Combine with biscuits: Remove from heat and fold in the crushed biscuits, making sure all pieces are well coated with the chocolate mixture.
- Create the first layer: Transfer about 2/3 of the chocolate biscuit mixture to the prepared pan, pressing down firmly and evenly with the back of a spoon or flat-bottomed glass to create a compact base.
- Add the caramel layer: If using store-bought caramel sauce, warm it slightly for easier spreading. Pour and spread the caramel evenly over the biscuit layer. If adding salt for a salted caramel flavor, sprinkle it over the caramel now.
- Top with remaining mixture: Crumble the remaining 1/3 of the chocolate biscuit mixture over the caramel layer, creating a rougher, more textured top surface.
- Add nuts and chips: Scatter the mixed nuts and caramel chips over the top, gently pressing them into the surface.
- Drizzle with toppings: Warm the additional caramel sauce slightly and drizzle over the top of the cake. Follow with drizzles of melted dark chocolate for a decorative finish.
- Chill to set: Refrigerate the cake for at least 4 hours, preferably overnight, until completely set and firm.
- Serve: Remove from the refrigerator 15-20 minutes before serving to take the chill off. Lift out using the parchment paper overhang, cut into squares, and enjoy!
Nutritional Information and Timing
Prep Time: 25 minutes Chilling Time: 4 hours minimum (overnight preferred) Total Time: 4 hours 25 minutes (plus overnight chilling)
Servings: 16 squares
Per Serving:
- Calories: 450
- Fat: 27g
- Saturated Fat: 13g
- Carbohydrates: 48g
- Sugar: 35g
- Protein: 5g
- Fiber: 2g
- Sodium: 250mg
Cooking Tips and Tricks
- Biscuit selection matters: While digestive biscuits or graham crackers are traditional, you can experiment with other crisp cookies like shortbread, Biscoff, or even chocolate sandwich cookies (remove cream filling first).
- Texture balance: For the perfect texture, aim for a mix of fine crumbs and small chunks when crushing your biscuits. This creates both structure and satisfying texture.
- Chocolate melting technique: When melting the chocolate mixture, use low heat and stir constantly to prevent scorching. If you have a double boiler, even better.
- Easy release: The parchment paper sling is crucial for easy removal. Make sure it extends up all sides of the pan with some overhang to use as handles.
- Caramel consistency: If your store-bought caramel is too thick to spread, warm it slightly in the microwave (10-15 seconds), or stir in 1-2 tablespoons of heavy cream to thin it.
- Neat cutting: For clean slices, dip your knife in hot water and wipe dry between cuts. This melts through the chocolate slightly for smoother edges.
- Proper setting: Resist the temptation to cut the cake too soon. Proper chilling is essential for the layers to set and hold together when sliced.
- Temperature tip: Taking the cake out of the refrigerator 15-20 minutes before serving allows flavors to bloom and textures to soften slightly for the best eating experience.
Variations and Substitutions
- Cookie variations: Try using chocolate digestives, gingersnaps, Biscoff cookies, or Oreos (with filling removed) for different flavor profiles.
- Chocolate options: Experiment with different chocolate combinations like all dark for intensity, all milk for sweetness, or add white chocolate for visual contrast.
- Nut-free version: Replace nuts with additional biscuit pieces, mini marshmallows, or dried fruit for a nut-free alternative.
- Boozy twist: Add 2-3 tablespoons of Baileys, Kahlúa, or rum to the chocolate mixture for an adult version.
- Flavor enhancements: Add 1 teaspoon of instant coffee powder to the chocolate mixture for a mocha flavor, or 1/2 teaspoon of cinnamon for warmth.
- Fruit additions: Layer in dried cranberries, cherries, or chopped dried apricots for fruity bursts of flavor.
- Vegan adaptation: Use dairy-free chocolate, plant-based butter, and coconut condensed milk caramel for a vegan version.
- Layered approach: Create more distinct layers by adding a middle layer of white chocolate ganache or peanut butter between the biscuit and caramel layers.
Common FAQs
Q: Can I make this cake ahead of time?
A: Absolutely! This cake actually improves with time as the flavors meld together. You can make it up to 3 days in advance and keep refrigerated.
Q: My cake didn’t set properly. What went wrong?
A: The most common cause is not chilling it long enough. Make sure to give it at least 4 hours, preferably overnight. Another possibility is that the chocolate mixture was too runny—ensure you use the correct proportions of ingredients.
Q: Can I freeze this cake?
A: Yes! This cake freezes beautifully. Wrap it well in plastic wrap and then aluminum foil, and freeze for up to 3 months. Thaw overnight in the refrigerator before serving.
Q: The caramel layer is oozing out when I cut the cake. How can I prevent this?
A: Make sure your caramel layer is completely set before cutting. Additionally, using a slightly thicker caramel or adding 1 tablespoon of butter to your caramel will help it set firmer.
Q: Can I use homemade caramel instead of store-bought?
A: Definitely! If making homemade caramel, cook it to a slightly thicker consistency than you would for a sauce, so it sets properly in the cake.
Storage and Make-Ahead Tips
Refrigerator:
- Store in an airtight container in the refrigerator for up to 1 week.
- Keep layers separated with parchment paper if stacking slices.
- The flavor actually improves after 24-48 hours as the biscuits soften and the flavors meld.
Freezer:
- This cake freezes exceptionally well for up to 3 months.
- Cut into individual portions before freezing for easy thawing.
- Wrap each piece tightly in plastic wrap and then place in a freezer-safe container or bag.
- Thaw overnight in the refrigerator or at room temperature for 2-3 hours.
Make-Ahead Options:
- Prepare the entire cake up to 3 days before serving and keep refrigerated.
- For an event, you can make the base and caramel layers, refrigerate, and add the toppings and decorative drizzles the day of serving.
Serving Suggestions:
- For a dessert table, cut into smaller bite-sized pieces.
- Serve with a scoop of vanilla ice cream for an indulgent dessert.
- Pair with coffee or a glass of milk for the perfect afternoon treat.
- For special occasions, decorate with gold dust or edible glitter before the chocolate and caramel drizzles set.
Transportation Tips:
- If transporting to an event, keep the cake in the pan until you arrive.
- Transport in a cooler with ice packs if traveling more than 30 minutes.
- Drizzle with toppings after arrival for the freshest appearance.
This No-Bake Chocolate Caramel Biscuit Cake is the perfect solution when you need an impressive dessert without the fuss of baking. Its dramatic appearance belies the simplicity of its preparation, while the combination of textures and flavors creates a truly memorable treat. Whether prepared for a special occasion or as an everyday indulgence, this versatile dessert is sure to become a favorite in your recipe collection. The make-ahead nature and excellent storage capabilities make it particularly perfect for busy hosts or anyone looking to minimize day-of preparation while still delivering maximum impact!