Introduction
Discover the magic of homemade ice cream with just two simple ingredients! This stunning blueberry ice cream requires no special equipment, no condensed milk, and no complicated techniques—yet delivers creamy, scoopable perfection every time. The beautiful pale purple hue and bursts of blueberry flavor create a refreshing treat that tastes like it came from a premium ice cream shop. Perfect for summer gatherings or a special weeknight dessert, this recipe proves that sometimes the simplest approaches yield the most extraordinary results. Best of all, you’ll avoid the artificial additives and excessive sugar found in many store-bought varieties.
Ingredients
- 500ml (2 cups) heavy whipping cream (33% fat content)
- 170g (2/3 cup) blueberry jam
Instructions
Step 1: Prepare Your Equipment
- Find a freezer-safe container with a lid. The recipe recommends a container measuring approximately 25 x 18 cm (9.8 x 7.1 inches), which creates the perfect depth for freezing and scooping.
- Make sure your container is completely dry before beginning.
- Chill the container in the freezer for about 15 minutes before starting the recipe (this helps the ice cream freeze more evenly).
Step 2: Whip the Cream
- Pour the cold heavy whipping cream into a large mixing bowl.
- Using an electric mixer with whisk attachments, begin whipping the cream on medium speed.
- Gradually increase to high speed and continue beating until the cream forms stiff peaks. This typically takes 3-5 minutes, depending on the power of your mixer.
- Be careful not to over-whip the cream, which could cause it to become grainy or separate. The cream should hold its shape firmly but still look smooth and glossy.
Step 3: Incorporate the Jam
- Add the blueberry jam to the whipped cream.
- Using a spatula, gently fold the jam into the whipped cream with a downward stroke, followed by scraping along the bottom of the bowl and turning upward.
- Continue folding until the jam is evenly distributed throughout the cream, creating beautiful purple swirls. Some streaks of jam are desirable for flavor bursts in the finished ice cream.
- Be careful not to overmix, as this will deflate the air bubbles in the whipped cream that create the ice cream’s light texture.
Step 4: Freeze the Ice Cream
- Transfer the mixture to your chilled, freezer-safe container.
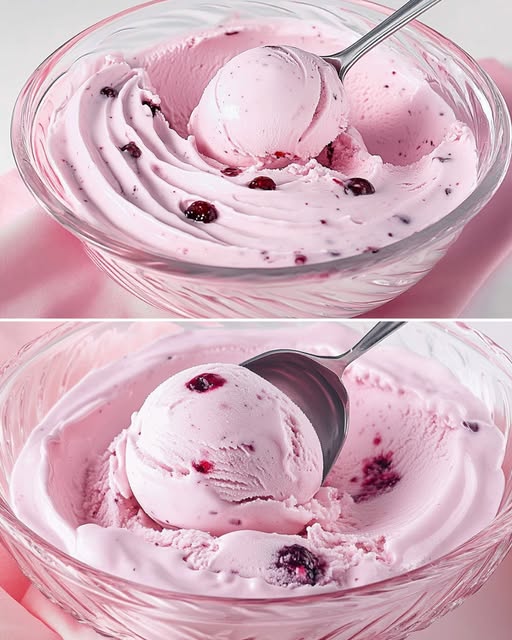
- Use a spatula to create decorative swirls on the top if desired (as shown in the image).
- Cover with a lid or plastic wrap pressed directly onto the surface to prevent ice crystals from forming.
- Place in the freezer for at least 4 hours, or until completely frozen.
- For best texture, allow the ice cream to sit at room temperature for 5-10 minutes before serving.
Nutritional Information
Per serving (recipe makes approximately 8 servings):
- Calories: 245
- Total Fat: 22g
- Saturated Fat: 14g
- Cholesterol: 82mg
- Sodium: 25mg
- Total Carbohydrates: 12g
- Dietary Fiber: 0.5g
- Sugars: 11g
- Protein: 1.5g
Preparation Time: 10 minutes Freezing Time: 4 hours Total Time: 4 hours 10 minutes
Cooking Tips and Tricks
- Cold is crucial: Make sure your cream is very cold before whipping—this helps it whip faster and hold more air. Consider chilling your mixing bowl and beaters in the freezer for 15 minutes before starting.
- Whipping technique: Start at a lower speed to prevent splashing, then gradually increase. This creates smaller, more stable air bubbles for a creamier texture.
- Jam selection: Choose a high-quality jam with chunks of real fruit for the best flavor and texture. Homemade jam works wonderfully if you have it available.
- Perfect ripple effect: For more defined jam swirls, fold minimally or add half the jam, fold gently, then dollop the remaining jam on top and give just a few swirls with a knife before freezing.
- Smooth scooping: Run your ice cream scoop under hot water before each serving for picture-perfect scoops like those shown in the image.
Variations and Substitutions
- Different fruits: This recipe works beautifully with any jam flavor—try strawberry, raspberry, peach, or mixed berry for delicious variations.
- Chocolate version: Replace the fruit jam with 1/2 cup chocolate hazelnut spread or 1/3 cup cocoa powder mixed with 3 tablespoons honey.
- Adult flavor: For a sophisticated dessert, add 1-2 tablespoons of liqueur that complements your jam flavor (such as Grand Marnier for orange jam or Chambord for raspberry).
- Lighter option: For a reduced-fat version, use half whipping cream and half Greek yogurt. The texture will be slightly different but still delicious.
- Add-ins: Fold in 1/3 cup of mix-ins like chocolate chips, crushed cookies, chopped nuts, or fresh blueberries along with the jam for extra texture.
Common FAQs
Why is my ice cream too hard to scoop?
Homemade ice cream without additives naturally freezes harder than store-bought varieties. Let it sit at room temperature for 5-10 minutes before serving. Alternatively, add 1 tablespoon of vodka or 1 tablespoon of honey to the mixture before freezing—both lower the freezing point.
Can I use low-fat cream or milk instead?
Heavy cream is essential for this recipe as its high fat content creates the creamy texture and prevents iciness. Using lower-fat alternatives will result in a harder, more icy texture.
How long will this ice cream keep in the freezer?
This homemade ice cream will keep well for up to 2 weeks when stored in an airtight container. For best quality, consume within 1 week.
Can I make this without an electric mixer?
Yes, but it requires significant arm strength and time. Using a hand whisk, vigorously beat the cream until it forms stiff peaks (this may take 10-15 minutes of continuous whisking).
Why doesn’t this recipe need eggs or condensed milk like other homemade ice creams?
The air incorporated during the whipping process and the fat content of the heavy cream provide enough structure and creaminess without requiring eggs or condensed milk as stabilizers.
Storage and Make-Ahead Tips
- Freezer container: Use a shallow, wide container rather than a deep one for more even freezing. Metal containers conduct cold better than plastic, resulting in faster freezing.
- Preventing freezer burn: Press a piece of plastic wrap directly onto the surface of the ice cream before putting the lid on to prevent ice crystals from forming.
- Long-term storage: For storage beyond a week, transfer portions to smaller containers as you use it, to minimize exposure to air which causes crystallization.
- Re-softening: If your ice cream becomes too hard after long storage, place it in the refrigerator for 20-30 minutes to soften to a scoopable consistency rather than leaving it at room temperature, which can cause uneven melting.
- Make-ahead serving idea: For an elegant dessert option, scoop balls of ice cream onto a parchment-lined tray and refreeze. These pre-scooped portions can be quickly arranged in serving dishes when needed.
This two-ingredient blueberry ice cream revolutionizes homemade ice cream with its simplicity and spectacular results. By eliminating the need for condensed milk, eggs, sugar, or an ice cream maker, this recipe makes gourmet-quality frozen treats accessible to everyone. The beautiful color and fresh flavor of blueberries shine against the backdrop of rich, creamy whipped cream, creating a dessert that’s both visually stunning and deliciously satisfying. Whether you’re a seasoned home chef or a kitchen novice, this recipe delivers professional results with minimal effort—proving that sometimes, less truly is more when it comes to creating memorable desserts.