Sometimes you want a snack that feels wholesome without the need for added sugar or fancy ingredients. These apple, peanut butter, and bran bars fit that bill perfectly. They come together easily with pantry staples and offer a nice balance of natural sweetness from ripe bananas and apples, plus the comforting flavor of peanut butter and cinnamon. The bran and oats provide fiber and texture, making these bars a satisfying grab-and-go option for breakfast or an afternoon lift.
What I appreciate about this recipe is how forgiving it is—ripe bananas make the bars naturally sweet and moist, so there’s no need to add extra sugars that can make treats overly sweet or heavy. Baking them just until the edges turn golden and the center firms up prevents dryness and keeps the bars chewy but not crumbly. They’re an approachable, no-fuss snack that also feels a little homemade and thoughtful.
Why You’ll Love This Recipe
- Made with simple, everyday ingredients you likely already have
- Naturally sweetened with fruit—no added sugars or artificial sweeteners
- High in fiber thanks to wheat bran and oats, ideal for a healthy start
- Easy to customize with mix-ins or nut butters you prefer
- Bakes quickly with minimal prep and cleanup
- Reliable texture that holds together well once cooled
Ingredients
- 1 1/2 cups (90 g) wheat bran
- 1 cup (90 g) rolled oats
- 2 ripe bananas, mashed (about 1 cup / 240 g)
- 1 large apple, grated (about 1 cup / 120 g)
- 1/2 cup (125 g) natural peanut butter
- 1 teaspoon ground cinnamon
- 1 teaspoon vanilla extract
- Pinch of salt
Ingredient Notes
Wheat bran and rolled oats: Bran adds fiber and a slightly nutty flavor, while oats offer a chewy texture. Together they help the bars hold shape without needing flour or eggs.
Ripe bananas: The riper, the better—they lend natural sweetness and moisture, eliminating the need for added sugar.
Apple: Grating the apple keeps the bars moist and subtly fruity without overpowering the peanut butter’s richness.
Natural peanut butter: Choose one with just peanuts and perhaps a bit of salt for the best flavor and cleanest ingredient list.
Cinnamon and vanilla: These enhance warmth and depth but feel free to adjust to your taste.
Kitchen Tools Needed
- Mixing bowl
- Grater (for the apple)
- Fork or potato masher (for mashing bananas)
- 8-inch (20 cm) square baking pan
- Parchment paper
- Measuring cups and spoons
Step-by-Step Instructions
-
Preheat your oven to 350°F (175°C). Line an 8-inch square baking pan with parchment paper, leaving some overhang for easy removal later.
-
In a large bowl, combine the wheat bran, rolled oats, cinnamon, and a pinch of salt. Stir well to distribute the spices evenly.
-
Mash the ripe bananas with a fork until mostly smooth, leaving a little texture.
-
Grate the apple directly into the bowl with bananas to prevent browning and mix in the vanilla extract.
-
Add the banana-apple mixture to the dry ingredients, followed by the peanut butter. Stir everything together until well combined. The mixture should be sticky but hold together when pressed.
-
Transfer the batter to the prepared pan and press it down firmly and evenly with the back of a spoon or your hands. This ensures the bars don’t crumble when baked.
-
Bake for 24 to 28 minutes. The bars are done when the edges turn golden brown, and the center feels set—just firm but not dry when touched.
-
Let the bars cool completely in the pan on a wire rack before lifting out and cutting into 12 squares. Cooling is essential for the bars to firm up properly and hold their shape.
Pro Tips
- Use very ripe bananas for the best natural sweetness and moist texture. Under-ripe bananas will dry out the bars.
- Press the mixture firmly into the pan—this really helps the bars hold together once baked.
- Don’t rush cutting; the bars need to cool entirely or they’ll crumble.
- If your peanut butter is thick, warming it slightly in the microwave makes mixing easier.
- If you prefer a less pronounced apple flavor, peel the apple first before grating.
Common Mistakes
- Not pressing the mixture firmly enough before baking can lead to crumbly bars.
- Cutting the bars while warm often causes them to fall apart—always cool fully.
- Using underripe bananas means you’ll need to add sweetener, which changes the recipe balance.
- Overbaking dries out the bars, so watch carefully after 24 minutes.
Variations
- Swap peanut butter for almond or cashew butter for a different nutty flavor.
- Add 1/4 cup (30 g) chopped nuts or seeds for crunch.
- Stir in 1/4 cup (40 g) raisins or dried cranberries to introduce a bit of natural sweetness and chew.
- Replace cinnamon with pumpkin pie spice or ginger for a twist.
Serving Suggestions
Serve these bars as a quick breakfast on the go, a healthy snack with a glass of milk, or alongside tea or coffee. They’re perfect packed in lunchboxes or as a post-workout boost.
Storage Instructions
Store the bars in an airtight container at room temperature for up to 3 days. For longer storage, keep them in the fridge for up to a week or freeze in a sealed bag or container for up to 3 months.
Reheating Tips
These bars are best enjoyed at room temperature. If you prefer warm bars, microwave a single bar for 10 to 15 seconds—just enough to soften the peanut butter but not dry out the bar.
Nutrition Estimate (per bar, 12 bars total)
- Calories: 140
- Protein: 4 g
- Carbohydrates: 20 g
- Fat: 6 g
Recipe Summary
Prep Time: 10 minutes
Cook Time: 24–28 minutes
Total Time: About 40 minutes
Servings: 12 bars
Cuisine: American
Course: Snack / Breakfast
Calories: 140 per bar
Frequently Asked Questions
Can I use apple sauce instead of grated apple?
Using apple sauce will change the texture and moisture balance, likely making the bars softer and a little cakier. Grated apple keeps the bars firm and adds a bit of texture.
Are these bars gluten-free?
Not as written, because wheat bran contains gluten. Substitute with gluten-free bran and certified gluten-free oats to make a gluten-free version.
Can I replace the peanut butter with another nut butter?
Yes, almond, cashew, or sunflower seed butter all work well and bring their own flavors.
How ripe do the bananas need to be?
They should be very ripe with brown spots—this ensures sweetness and moisture. Green or just yellow bananas won’t work as well.
Can I make these bars vegan?
Yes, this recipe is naturally vegan as it contains no dairy or eggs.
There’s something simple and satisfying about a homemade snack bar that doesn’t rely on sugar or processed ingredients. These apple, peanut butter, and bran bars are one of those recipes that quickly become a staple because they’re easy to make, naturally sweet, and hearty enough to keep you going between meals. Whether for lunchbox treats or a quick breakfast, they strike just the right balance of health and flavor.
Apple, Peanut Butter, and Bran Bars
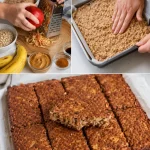
Wholesome bars made with apple, peanut butter, and bran, naturally sweetened with ripe bananas, perfect for breakfast or a snack.
Main Ingredients
- 1.5 cups wheat bran (Adds fiber and a slightly nutty flavor.)
- 1 cup rolled oats (Provides chewy texture.)
- 2 ripe bananas mashed (about 1 cup / 240 g) (Should be very ripe for natural sweetness.)
- 1 large apple, grated (about 1 cup / 120 g) (Keeps the bars moist without overpowering.)
- 1/2 cup natural peanut butter (Choose one with just peanuts and perhaps salt.)
- 1 teaspoon ground cinnamon (Enhances warmth and depth.)
- 1 teaspoon vanilla extract (Adds flavor.)
- 1 pinch salt (Balances sweetness.)
Preparation
- Preheat your oven to 350°F (175°C). Line an 8-inch square baking pan with parchment paper.
- In a large bowl, combine the wheat bran, rolled oats, cinnamon, and a pinch of salt. Stir well.
- Mash the ripe bananas until mostly smooth.
- Grate the apple into the bowl with bananas and mix in the vanilla extract.
- Add the banana-apple mixture to the dry ingredients, followed by the peanut butter. Stir until well combined.
- Transfer the batter to the prepared pan and press it down firmly and evenly.
Baking
- Bake for 24 to 28 minutes or until the edges are golden brown and the center is set.
- Let the bars cool completely in the pan on a wire rack before cutting.
Use very ripe bananas for best results and press the mixture firmly into the pan to prevent crumbling.